Takto vyzerá každé zadanie od začiatku po koniec: prijmeš ho v Classroom 50, vypracuješ v Kubeflow, odovzdáš na GitHub a výsledok si pozrieš na sigma. Prvýkrát to prejdeme spolu na cvičení, potom je to vždy rovnaké.
Pojmy:
- Classroom 50: nástroj, cez ktorý učiteľ rozdáva zadania. Každému študentovi vytvorí vlastný súkromný repository na GitHub.
- clone: stiahnutie repository z GitHub do Kubeflow (raz, na začiatku zadania).
- commit: uložený „snímok“ zmien s popisom (robíš priebežne, koľkokrát chceš).
- push: odoslanie commitov na GitHub (= odovzdanie).
- automatické testy: kontrola, ktorá sa pri niektorých zadaniach spustí sama po každom push a ukáže, či je práca v poriadku (časť 6).
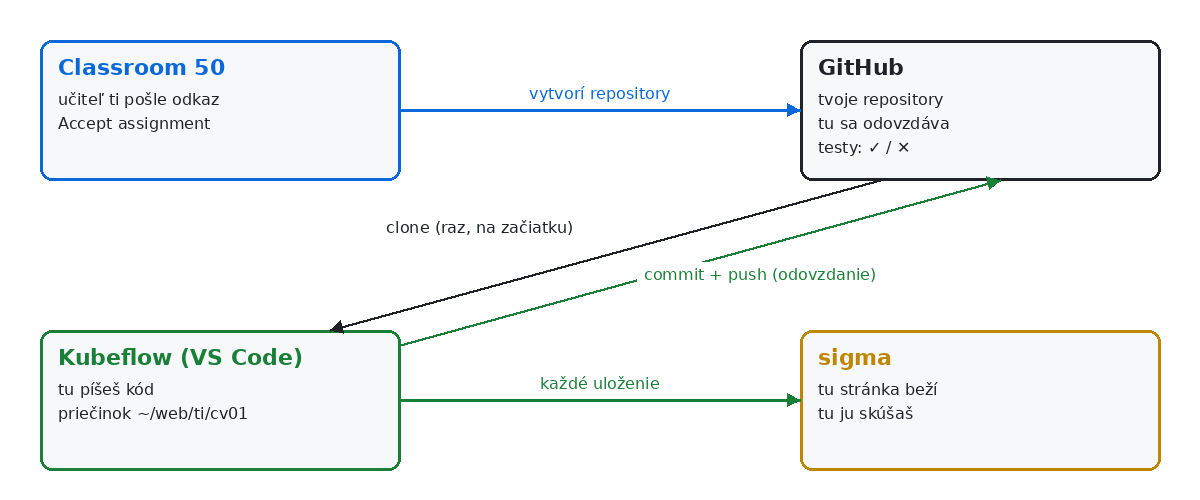
Časti 1 až 7 sú jedno zadanie za sebou. Časť 8 hovorí, ako pokračovať na druhý deň, časť 10 rieši, keď niečo nejde.
This is what every assignment looks like from start to finish: you accept it in Classroom 50, do it in Kubeflow, submit it to GitHub and look at the result on sigma. The first time we go through it together in the lab; after that it is always the same.
Terms:
- Classroom 50: the tool the teacher hands out assignments with. It creates a private repository on GitHub for every student.
- clone: downloading the repository from GitHub into Kubeflow (once, at the start of an assignment).
- commit: a saved "snapshot" of changes with a description (you do it as you go, as often as you like).
- push: sending the commits to GitHub (= submitting).
- automatic tests: a check that, for some assignments, runs by itself after every push and shows whether your work is fine (part 6).
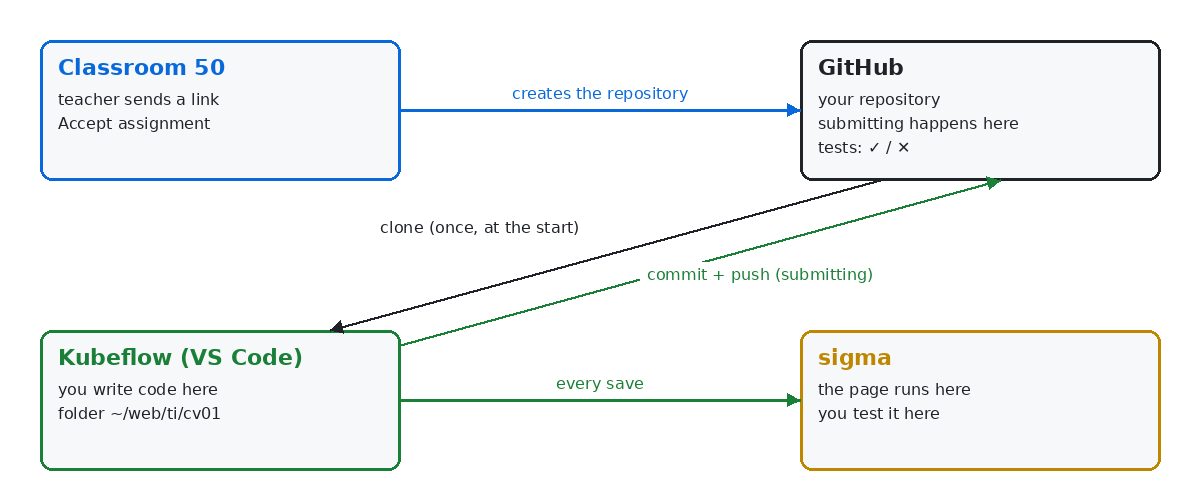
Parts 1 to 7 are one assignment in order. Part 8 says how to continue the next day, part 10 covers what to do when something fails.
1. Kubeflow: príprava (pri každom otvorení)1. Kubeflow: getting ready (every time you open it)
- Otvor ml.cloud.tuke.sk, vľavo Notebooks, pri svojom notebooku CONNECT. Ak je notebook zastavený (sivý), najprv ho spusti ikonou trojuholníka a počkaj na zelenú fajku.
- Skontroluj, že v Explorer je hore WEB a adresa v prehliadači končí presne
?folder=/home/jovyan/web. Ak je tam iný priečinok (JOVYAN, TI,…/web/ti), zmeň koniec adresy na?folder=/home/jovyan/weba stlač Enter. Pri inom priečinku sa na sigma nenahráva nič, lebo nastavenie SFTP je vweb/.vscode/. - Skontroluj rozšírenia: dole na stavovej lište má byť Go Live. Ak tam nie je, Kubeflow rozšírenia po reštarte zmazal. Otvor terminál (menu ☰ vľavo hore, Terminal, New Terminal) a vlož tento príkaz (jeden riadok, Enter):
code-server --install-extension Natizyskunk.sftp --install-extension yandeu.five-server --install-extension bmewburn.vscode-intelephense-client --install-extension mblode.twig-language-2
Trvá to asi minútu. Potom stlač F1, napíš reload a vyber Developer: Reload Window (alebo F5). Nastavenie pripojenia na sigma zostáva, netreba ho robiť znova.
- Otvor terminál, ak ešte nie je otvorený: ☰, Terminal, New Terminal. Dole sa objaví riadok
jovyan@vscode-0:~$. Sem budeš písať príkazy.
Toto je celá príprava. Robíš ju pri každom otvorení Kubeflow, nielen pri novom zadaní. Bod 3 zaberie minútu a ušetrí ti hľadanie, prečo nejde Upload Folder.
- Open ml.cloud.tuke.sk, on the left Notebooks, next to your notebook CONNECT. If the notebook is stopped (grey), start it first with the triangle icon and wait for the green tick.
- Check that Explorer shows WEB at the top and the browser address ends exactly with
?folder=/home/jovyan/web. If another folder is open (JOVYAN, TI,…/web/ti), change the end of the address to?folder=/home/jovyan/weband press Enter. With any other folder nothing is uploaded to sigma, because the SFTP settings live inweb/.vscode/. - Check the extensions: the status bar at the bottom must show Go Live. If it does not, Kubeflow deleted the extensions on restart. Open the terminal (the ☰ menu at the top left, Terminal, New Terminal) and paste this command (one line, Enter):
code-server --install-extension Natizyskunk.sftp --install-extension yandeu.five-server --install-extension bmewburn.vscode-intelephense-client --install-extension mblode.twig-language-2
It takes about a minute. Then press F1, type reload and choose Developer: Reload Window (or F5). The connection settings to sigma stay; you do not have to set them again.
- Open the terminal if it is not open yet: ☰, Terminal, New Terminal. A line
jovyan@vscode-0:~$appears at the bottom. This is where you type commands.
That is the whole preparation. You do it every time you open Kubeflow, not only for a new assignment. Step 3 takes a minute and saves you wondering why Upload Folder is missing.
2. Classroom 50: prijatie zadania2. Classroom 50: accepting the assignment
- Učiteľ ti pošle odkaz na zadanie (na cvičení, v správe). Otvor ho, si na classroom50.org.
- Ak nie si prihlásený, klikni Sign in with GitHub (heslo a kód z authenticator app). Pri prvom prihlásení povoľ prístup tlačidlom Authorize.
- Klikni Accept assignment. Classroom 50 vytvorí repository s názvom
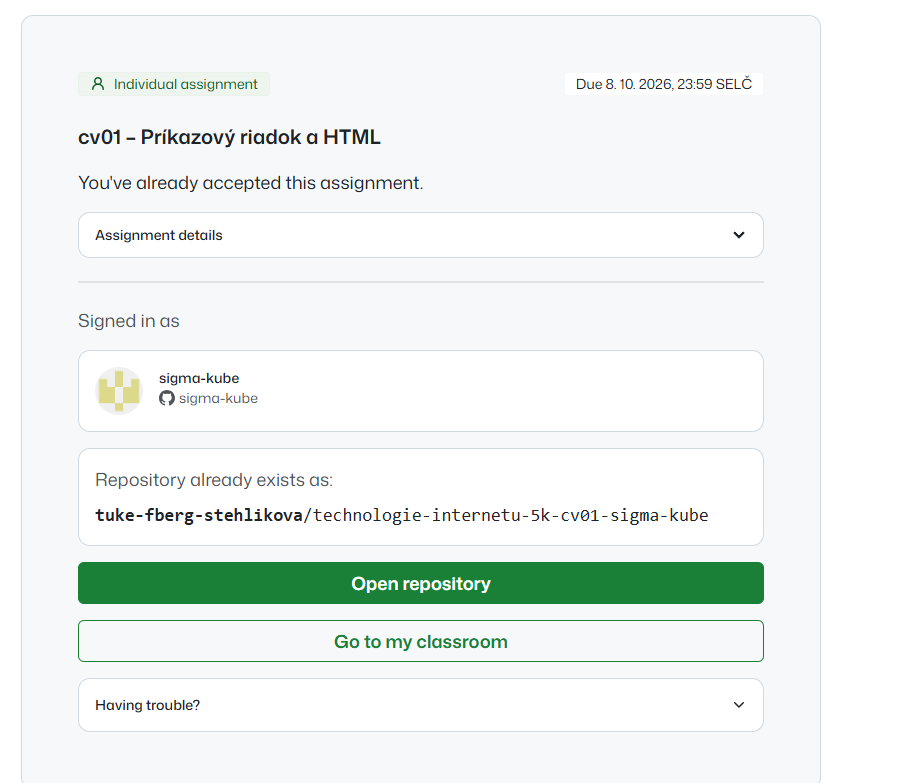
učebňa-zadanie-tvoje-username(napr.technologie-internetu-5k-cv01-jan-novak) a ukáže odkaz naň. Repository je súkromné, vidíš ho len ty a učiteľ. - Ak si zadanie už prijal, namiesto Accept uvidíš „You've already accepted this assignment“ a tlačidlo Open repository. To je v poriadku.
- The teacher sends you a link to the assignment (in the lab, in a message). Open it; you are on classroom50.org.
- If you are not signed in, click Sign in with GitHub (password and a code from the authenticator app). The first time, allow access with Authorize.
- Click Accept assignment. Classroom 50 creates a repository named
classroom-assignment-your-username(e.g.technologie-internetu-5k-cv01-jan-novak) and shows a link to it. The repository is private; only you and the teacher see it. - If you have already accepted the assignment, instead of Accept you see "You've already accepted this assignment" and an Open repository button. That is fine.
3. Clone: repository z GitHub do Kubeflow3. Clone: the repository from GitHub into Kubeflow
Clone je stiahnutie repository do Kubeflow. Robí sa raz, na začiatku zadania. Budeš prepínať medzi dvoma kartami prehliadača: Kubeflow (terminál) a GitHub (adresa).
- Kubeflow, terminál: prejdi do priečinka predmetu (názov podľa pokynu učiteľa, tu
ti):
cd ~/web/ti
- Kubeflow, terminál: napíš
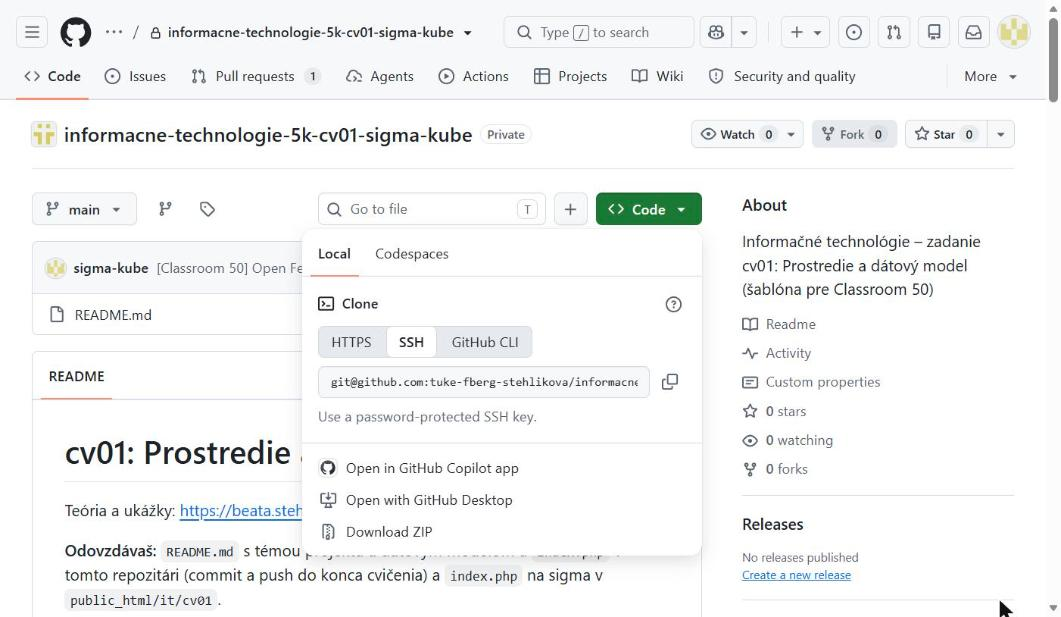
git clonea medzeru. Enter zatiaľ nestláčaj, príkaz ešte nie je celý. - GitHub: prepni sa na kartu so svojím repository (v Classroom 50 Open repository). Klikni zelené Code, záložka HTTPS, a klikni ikonu dvoch štvorčekov vpravo od adresy. Adresa je v schránke. Začína
https://github.com/tuke-fberg-stehlikova/a končí.git.
- Kubeflow, terminál: vráť sa do terminálu. Vlož adresu (Ctrl + V), napíš medzeru a
cv01(číslo cvičenia). Stlač Enter. Celý príkaz vyzerá takto:
git clone https://github.com/tuke-fberg-stehlikova/technologie-internetu-5k-cv01-jan-novak.git cv01
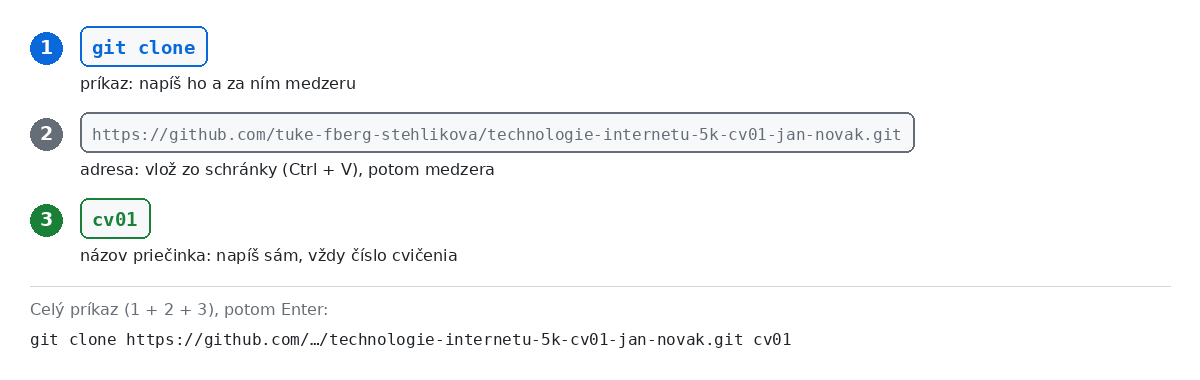
Posledné slovo príkazu je vždy číslo cvičenia: cv01, cv02, cv03… Do priečinka s týmto názvom sa repository stiahne. Ak ho vynecháš, vznikne priečinok s dlhým názvom repository a adresa tvojej stránky na sigma nebude sedieť so zadaním.
Prvé prihlásenie ku GitHub (len raz)
Pri prvom clone sa VS Code opýta, či smie otvoriť stránku GitHub:
- V okienku „Do you want code-server to open the external website? https://github.com/login/device“ klikni Open.
- Na stránke GitHub skontroluj, že je tam tvoje konto („Signed in as …“).
- Kód už máš v schránke, VS Code ho skopíroval sám. Klikni do prvého políčka, Ctrl + V, Continue.
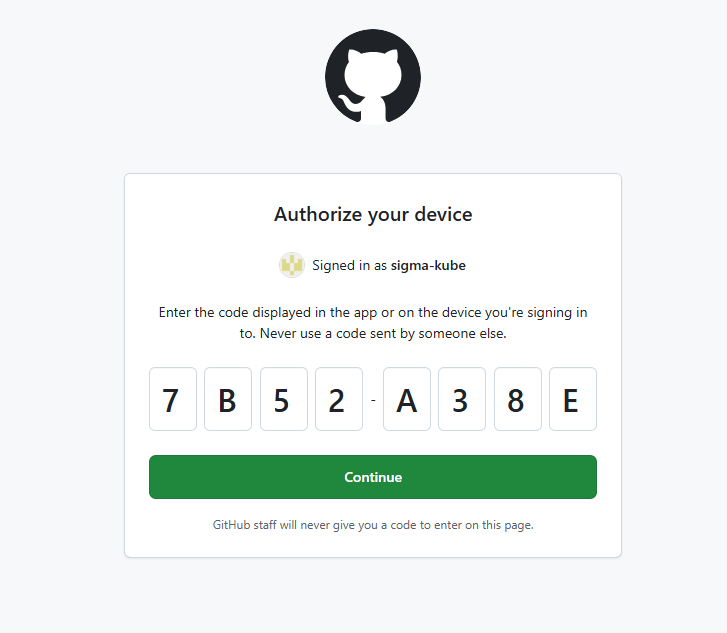
- Na stránke Authorize Visual Studio Code skontroluj svoje konto a klikni Authorize Visual-Studio-Code (tlačidlo zozelenie o pár sekúnd). Žltého upozornenia s IP adresou z Košíc sa neboj, je to školský server Kubeflow.
- Keď uvidíš „Congratulations, you're all set!“, kartu zavri a vráť sa do VS Code.
Ak vo VS Code vyskočí „…try a different way? (personal access token)“ alebo sa hore objaví okienko Username, nič nevypĺňaj (heslo nefunguje). Esc, v termináli Ctrl + C, potom rm -rf cv01 a clone spusti znova (šípka hore, Enter).
Clone je hotový, keď terminál vypíše Receiving objects: 100% … done a vráti sa prompt $.
Kontrola: máš priečinok cv01?
Ešte v priečinku ~/web/ti napíš:
ls
Vo výpise musí byť cv01. V Explorer sa objaví ti/cv01 a v ňom README.md (zadanie), prípadne súbory od učiteľa.
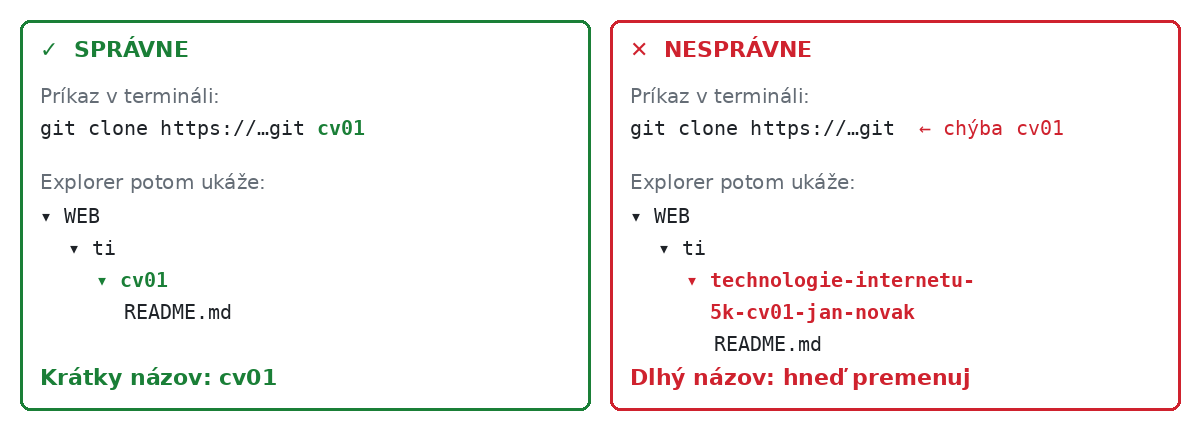
Ak vidíš dlhý názov, oprav ho hneď:
mv technologie-internetu-5k-cv01-jan-novak cv01
Dlhý názov nemusíš písať celý: napíš mv tech a stlač Tab, terminál ho doplní. Premenovanie nič nepokazí, Git v priečinku funguje ďalej.
Pracuj len v tomto priečinku. Súbory vytvorené mimo cv01 sa neodovzdajú.
A clone downloads the repository into Kubeflow. It is done once, at the start of an assignment. You will switch between two browser tabs: Kubeflow (the terminal) and GitHub (the address).
- Kubeflow, terminal: go to the course folder (the name as your teacher says, here
ti):
cd ~/web/ti
- Kubeflow, terminal: type
git cloneand a space. Do not press Enter yet; the command is not complete. - GitHub: switch to the tab with your repository (in Classroom 50 Open repository). Click the green Code, the HTTPS tab, and click the two-squares icon to the right of the address. The address is in your clipboard. It starts with
https://github.com/tuke-fberg-stehlikova/and ends with.git.
- Kubeflow, terminal: go back to the terminal. Paste the address (Ctrl + V), type a space and
cv01(the lab number). Press Enter. The whole command looks like this:
git clone https://github.com/tuke-fberg-stehlikova/technologie-internetu-5k-cv01-jan-novak.git cv01
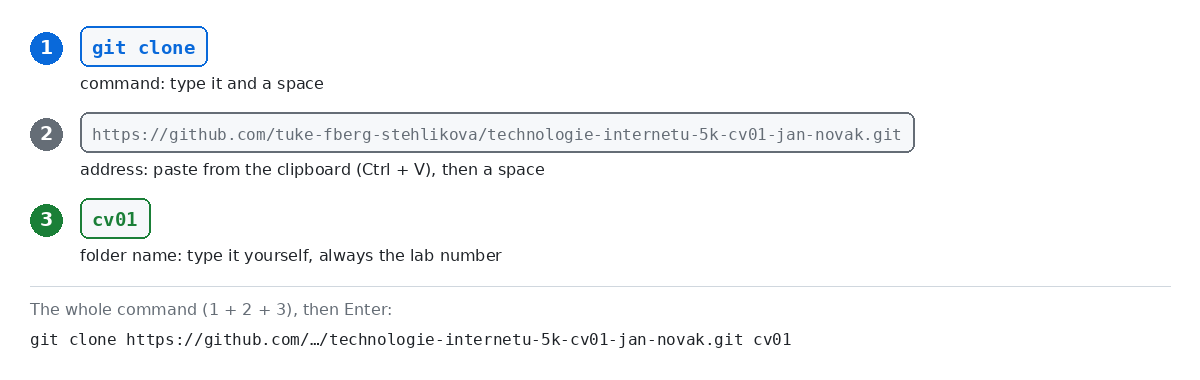
The last word of the command is always the lab number: cv01, cv02, cv03… The repository is downloaded into a folder with this name. If you leave it out, you get a folder with the long repository name and the address of your page on sigma will not match the assignment.
First sign-in to GitHub (only once)
On the first clone VS Code asks whether it may open a GitHub page:
- In the box "Do you want code-server to open the external website? https://github.com/login/device" click Open.
- On the GitHub page check that it is your account ("Signed in as …").
- The code is already in your clipboard; VS Code copied it for you. Click into the first box, Ctrl + V, Continue.
- On the Authorize Visual Studio Code page check your account and click Authorize Visual-Studio-Code (the button turns green after a few seconds). Do not worry about the yellow warning with an IP address in Košice; that is the school Kubeflow server.
- When you see "Congratulations, you're all set!", close the tab and go back to VS Code.
If VS Code shows "…try a different way? (personal access token)" or a Username box appears at the top, do not fill anything in (a password does not work). Esc, Ctrl + C in the terminal, then rm -rf cv01 and run the clone again (arrow up, Enter).
The clone is done when the terminal prints Receiving objects: 100% … done and the $ prompt comes back.
Check: do you have the cv01 folder?
Still in ~/web/ti, type:
ls
The listing must contain cv01. ti/cv01 appears in Explorer with README.md (the assignment) and possibly files from the teacher.
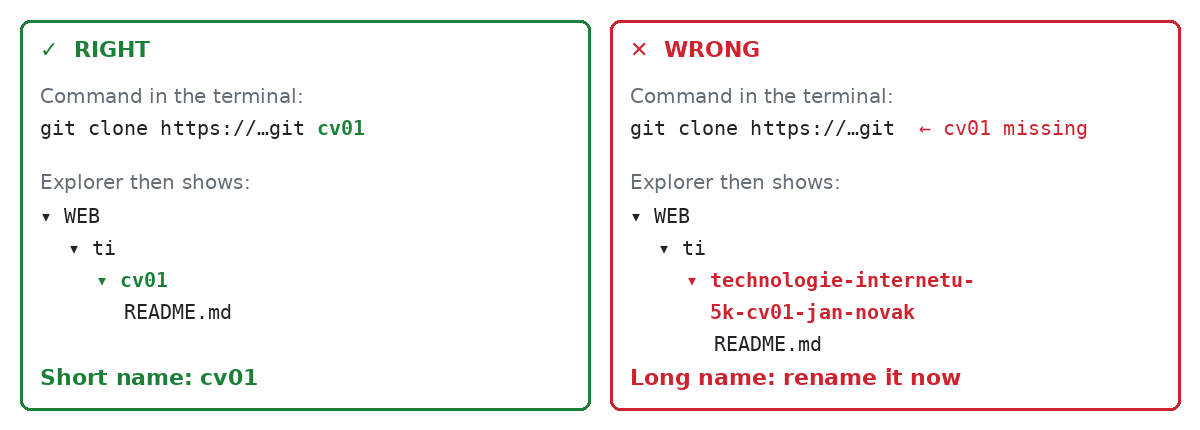
If you see the long name, fix it now:
mv technologie-internetu-5k-cv01-jan-novak cv01
You do not have to type the long name: type mv tech and press Tab; the terminal completes it. Renaming breaks nothing; Git in the folder keeps working.
Work only in this folder. Files created outside cv01 are not submitted.
4. Kubeflow: vypracovanie úloh4. Kubeflow: doing the tasks
Toto je väčšina času. Pracuješ v Kubeflow, v priečinku cv01, a nepotrebuješ k tomu žiadny Git príkaz.
- Zadanie je v
README.md. Otvor ho dvojklikom v Explorer. Pekne naformátovaný náhľad: Ctrl + Shift + V. - Nové súbory vytváraj v
cv01: pravý klik nacv01, New File…, názov s príponou (index.html,style.css). Všetko, čo má byť odovzdané, musí byť vcv01alebo v jeho podpriečinkoch. - Obrázok alebo iný súbor z počítača: otvor Prieskumník (Windows) alebo Finder, chyť súbor myšou a pusti ho na priečinok
cv01v Explorer. Kubeflow ho nahrá. Premenuješ ho pravým klikom, Rename….
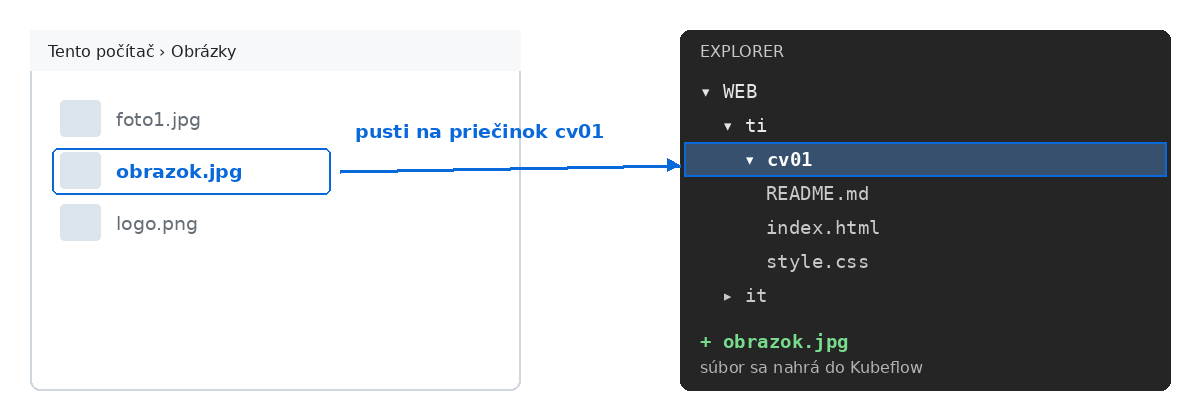
- Súbory vytvorené v termináli (napr.
history > historia.txtalebo skopírované cezcp) ulož tiež docv01: v termináli najprvcd ~/web/ti/cv01, alebo v príkaze napíš celú cestu. - Každé uloženie v editore (Ctrl + S, alebo samo po sekunde) ide na sigma; dole na fialovej stavovej lište sa na chvíľu ukáže
done index.html(názov nahraného súboru). Stránku si tak môžeš priebežne skúšať nahttps://sigma.tuke.sk/student/meno.priezvisko/ti/cv01/(obnovuješ cez F5). Rýchly náhľad bez sigma: pravý klik do súboru, Open with Five Server.
Na sigma sa samo nahráva len to, čo uložíš v editore. Pretiahnutý obrázok, súbor z terminálu alebo súbor skopírovaný cez cp sú zatiaľ len v Kubeflow. Na sigma ich dostaneš naraz v časti 7 (Upload Folder).
Ovládanie VS Code (Explorer, terminál, príkazy cd, ls, mkdir) je v návode 02, časť 7.
This is most of the time. You work in Kubeflow, in the cv01 folder, and need no Git command for it.
- The assignment is in
README.md. Open it with a double click in Explorer. A nicely formatted preview: Ctrl + Shift + V. - New files go into
cv01: right clickcv01, New File…, a name with an extension (index.html,style.css). Everything to be submitted must be incv01or its subfolders. - An image or another file from your computer: open File Explorer (Windows) or Finder, grab the file with the mouse and drop it on the
cv01folder in Explorer. Kubeflow uploads it. Rename it with a right click, Rename….
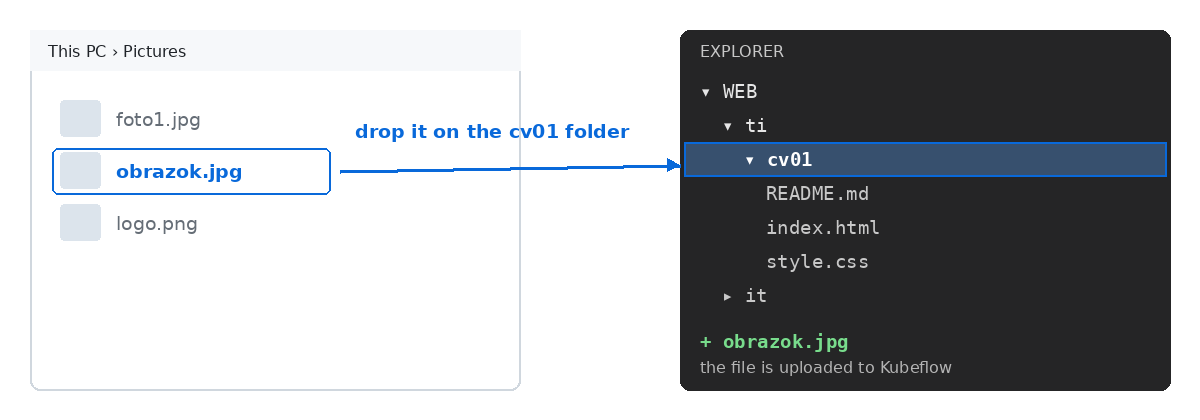
- Files created in the terminal (e.g.
history > historia.txtor copied withcp) also go intocv01: in the terminal firstcd ~/web/ti/cv01, or write the full path in the command. - Every save in the editor (Ctrl + S, or by itself after a second) goes to sigma; the purple status bar at the bottom briefly shows
done index.html(the name of the uploaded file). So you can test the page as you go athttps://sigma.tuke.sk/student/name.surname/ti/cv01/(refresh with F5). A quick preview without sigma: right click in the file, Open with Five Server.
Only what you save in the editor is uploaded to sigma by itself. A dragged image, a file from the terminal or a file copied with cp is so far only in Kubeflow. You get them all to sigma at once in part 7 (Upload Folder).
Working with VS Code (Explorer, terminal, the cd, ls, mkdir commands) is in guide 02, part 7.
5. Kubeflow: odovzdanie (commit a push)5. Kubeflow: submitting (commit and push)
Kedykoľvek máš kus hotový (a určite na konci), v termináli:
cd ~/web/ti/cv01
git status
Ukáže, ktoré súbory sú nové alebo zmenené (červené). Potom:
git add .
git commit -m "Add index page with header and menu"
git push
git add .zaradí všetky zmenené súbory do najbližšieho commitu.git commit -m "…"uloží snímok. Text v úvodzovkách píšeš sám: krátko, vlastnými slovami, čo si od posledného commitu urobil, aby si to o týždeň spoznal aj ty, aj učiteľ. Slovensky alebo anglicky, ale bez diakritiky, napríkladPridany kontaktny formular,Fix CSS on mobile,Hotova uloha 3. Nie „update“, „xxx“, „hotovo“.git pushpošle na GitHub. Vypíše niekoľko riadkov, posledný napr.30765e9..92ece15 main -> main. To je odovzdané. Ak má zadanie automatické testy, spustia sa práve teraz.
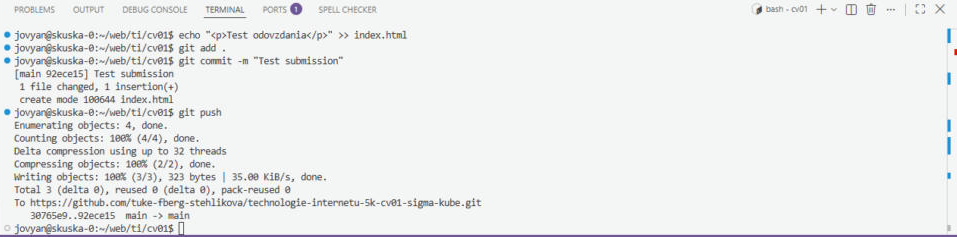
Commit a push môžeš robiť koľkokoľvek chceš. Učiteľ hodnotí stav na GitHub v čase termínu. Odporúčam commit po každom hotovom kroku, ak si niečo pokazíš, dá sa vrátiť.
To isté klikaním
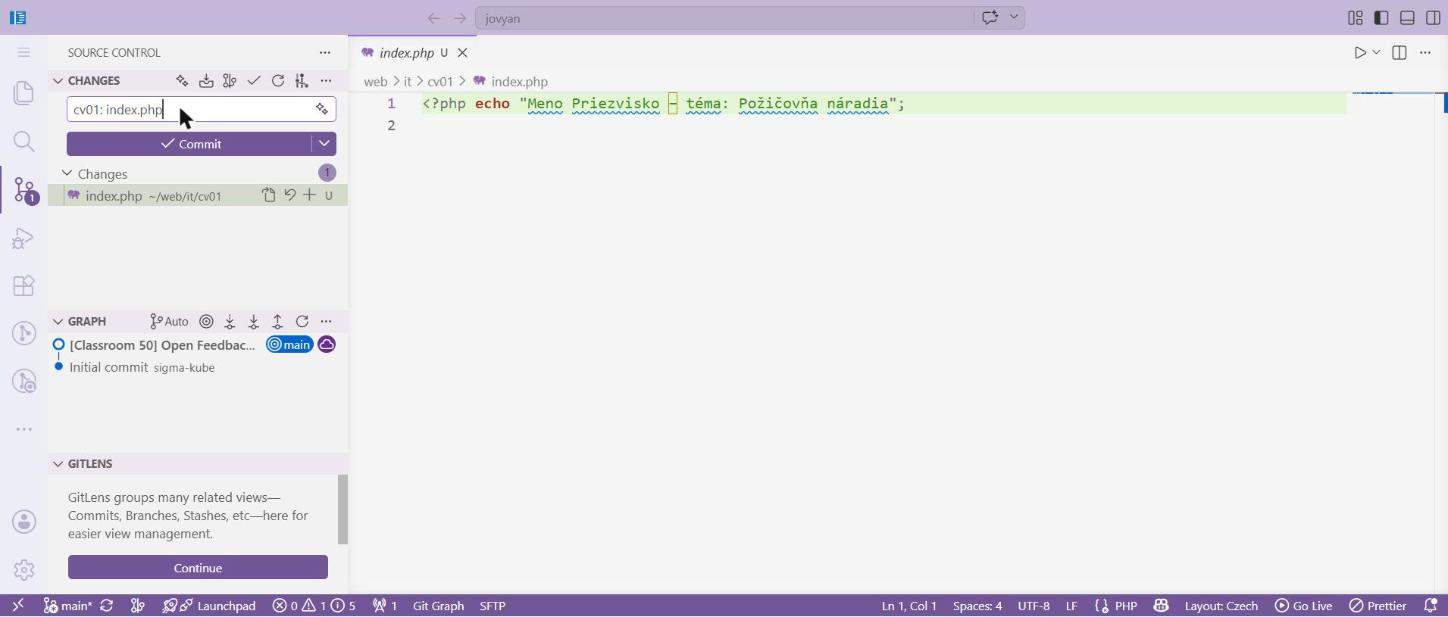
Vľavo ikona Source Control (vetvička). V zozname sú zmenené súbory. Do poľa hore napíšeš správu, klikneš Commit, potom Sync Changes (= push). Výsledok je rovnaký.
Whenever a piece is done (and certainly at the end), in the terminal:
cd ~/web/ti/cv01
git status
It shows which files are new or changed (red). Then:
git add .
git commit -m "Add index page with header and menu"
git push
git add .puts all changed files into the next commit.git commit -m "…"saves the snapshot. You write the text in quotes yourself: short, in your own words, what you did since the last commit, so that both you and the teacher recognize it a week later. Slovak or English, but without accents, for examplePridany kontaktny formular,Fix CSS on mobile,Hotova uloha 3. Not "update", "xxx", "done".git pushsends it to GitHub. It prints a few lines, the last one e.g.30765e9..92ece15 main -> main. That is submitted. If the assignment has automatic tests, they start right now.
You can commit and push as many times as you like. The teacher grades the state on GitHub at the deadline. I recommend a commit after every finished step; if you break something, you can go back.
The same by clicking
The Source Control icon on the left (the branch). The list shows changed files. Type the message in the box at the top, click Commit, then Sync Changes (= push). The result is the same.
6. GitHub: kontrola odovzdania a výsledok testov6. GitHub: checking the submission and the test result
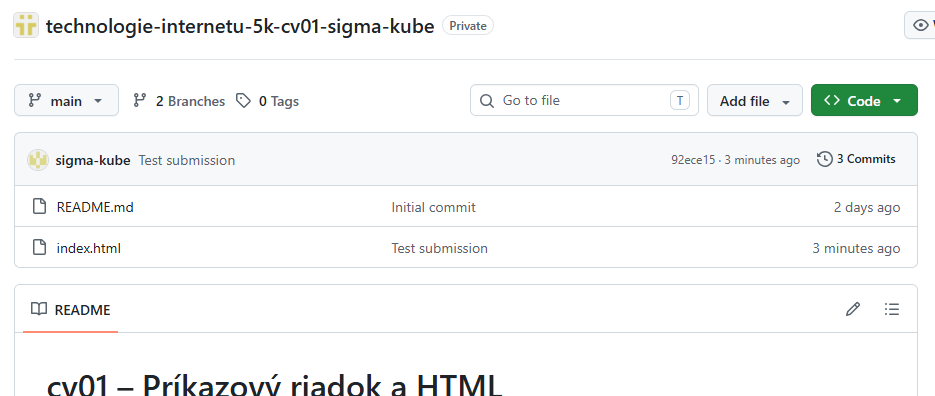
Otvor repository na GitHub (v Classroom 50 Open repository, alebo karta, ktorú máš otvorenú z časti 3) a obnov stránku (F5). Hore vidíš svoj posledný commit a pri súboroch, čo sa zmenilo. Klikni na text commitu a uvidíš presne, čo si zmenil (zelené riadky pribudli). Commits ukáže celú históriu. Toto vidí aj učiteľ.
Automatické testy
Pri niektorých zadaniach sa po každom push spustia automatické testy. Nič nespúšťaš, GitHub to urobí sám, výsledok je do 1 až 2 minút. Pozri sa do sivého riadka tesne nad zoznamom súborov: je v ňom tvoje meno, text posledného commitu a hneď za textom malá značka:
- zelená ✓: všetky testy prešli,
- červený ✕: aspoň jeden test neprešiel,
- žltá bodka: testy ešte bežia, počkaj a obnov stránku.
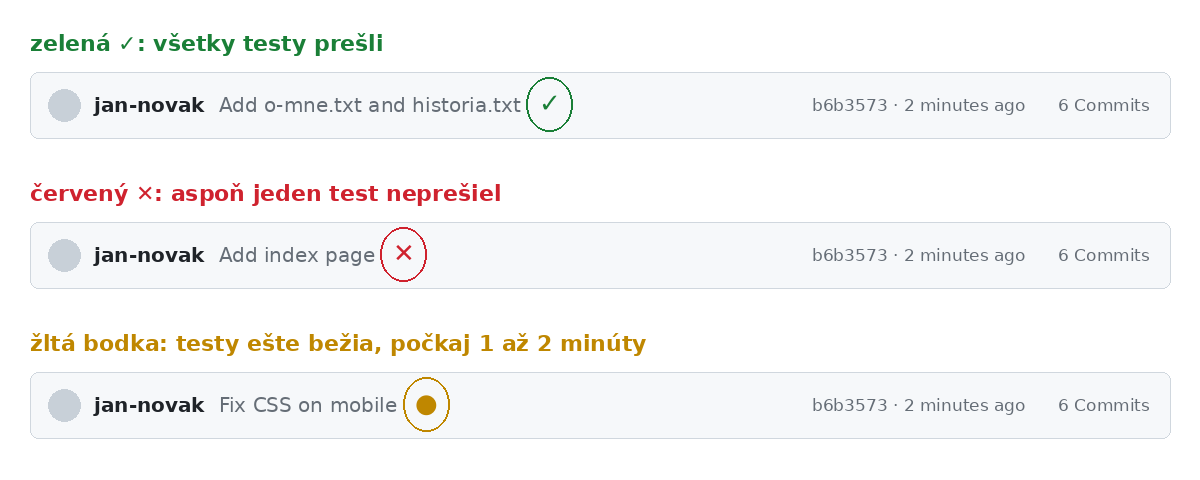
Červený ✕ neznamená, že sa push nepodaril. Práca je odovzdaná, len ešte nespĺňa všetko, čo testy kontrolujú. Ak pri commite nie je žiadna značka, zadanie testy nemá.
Ktorý test neprešiel:
- V repository klikni hore na záložku Actions (v riadku Code, Issues, Pull requests…).
- V zozname klikni na najvrchnejší riadok. Volá sa rovnako ako tvoj posledný commit.
- V ľavom stĺpci sú pod sebou setup a grade. Klikni na grade.
- Vpravo klikni na riadok Grade details. Rozbalí sa výpis.
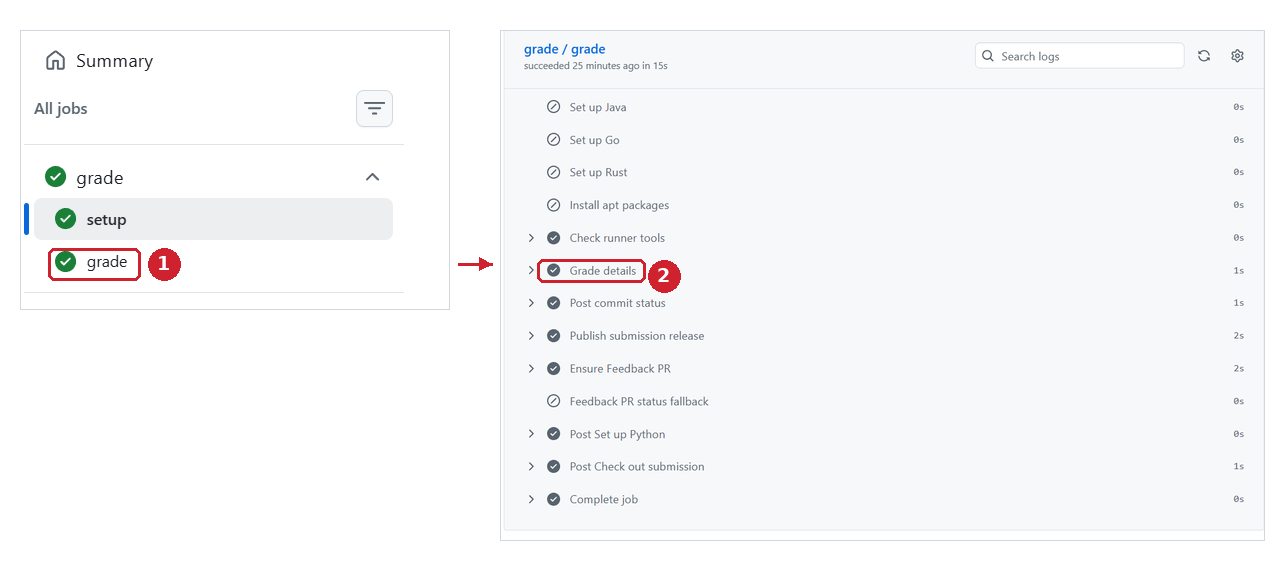
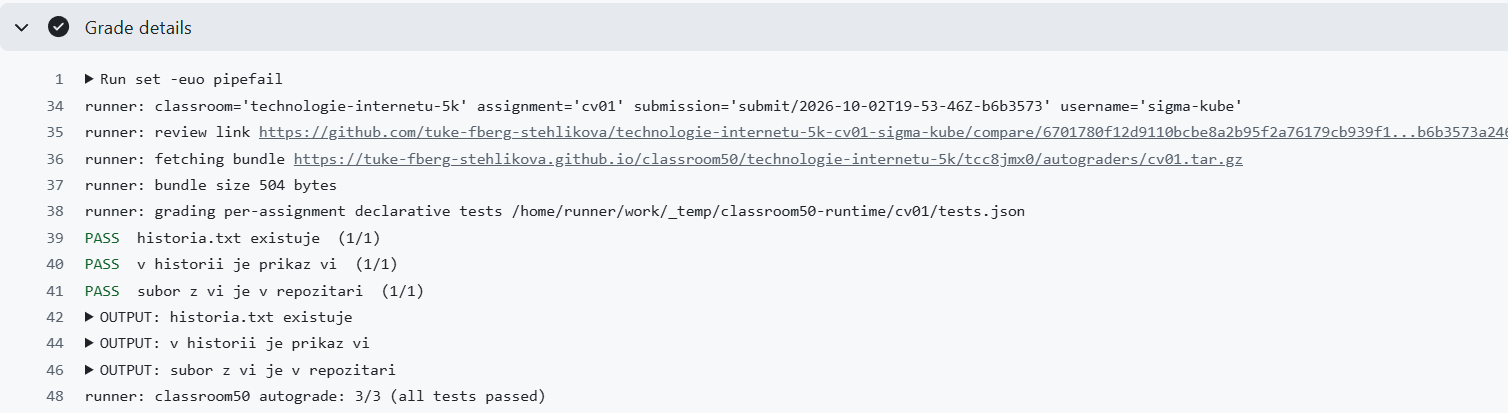
Pri každom teste je PASS (prešiel) alebo FAIL (neprešiel) a názov testu, ktorý hovorí, čo sa kontrolovalo. Posledný riadok je súčet, napr. autograde: 2/3.
Čo s červeným ✕: prečítaj si názov testu s FAIL, oprav to v Kubeflow a znova git add ., git commit, git push (časť 5). Testy sa spustia nanovo. Opakovať môžeš koľkokrát chceš, až do termínu.
Testy kontrolujú len to, čo sa dá overiť automaticky (napr. či súbor existuje a čo obsahuje). Zvyšok zadania, napríklad stránku na sigma, pozerá učiteľ.
Open the repository on GitHub (in Classroom 50 Open repository, or the tab you still have open from part 3) and refresh the page (F5). At the top you see your last commit, and next to the files what changed. Click the commit text to see exactly what you changed (green lines were added). Commits shows the whole history. The teacher sees this too.
Automatic tests
For some assignments automatic tests run after every push. You start nothing; GitHub does it by itself, and the result is there within 1 to 2 minutes. Look at the grey row just above the file list: it shows your name, the text of the last commit and, right after the text, a small mark:
- green ✓: all tests passed,
- red ✕: at least one test failed,
- yellow dot: the tests are still running; wait and refresh the page.
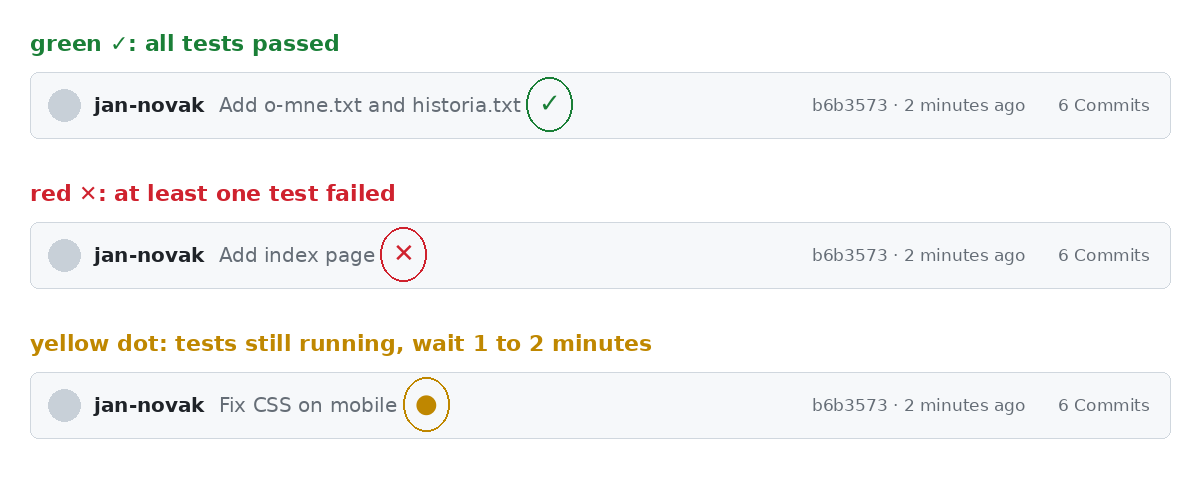
A red ✕ does not mean the push failed. Your work is submitted; it just does not yet meet everything the tests check. If there is no mark next to the commit, the assignment has no tests.
Which test failed:
- In the repository click the Actions tab at the top (in the row Code, Issues, Pull requests…).
- Click the topmost row in the list. It has the same name as your last commit.
- The left column shows setup and grade one under the other. Click grade.
- On the right click the Grade details row. The log opens.
Every test shows PASS or FAIL and the test name, which says what was checked. The last line is the total, e.g. autograde: 2/3.
What to do about a red ✕: read the name of the test marked FAIL, fix it in Kubeflow and again git add ., git commit, git push (part 5). The tests run again. You can repeat this as often as you like, until the deadline.
The tests check only what can be verified automatically (e.g. whether a file exists and what it contains). The rest of the assignment, such as the page on sigma, is checked by the teacher.
7. sigma: nahratie priečinka a kontrola stránky7. sigma: uploading the folder and checking the page
Na sigma sa počas práce dostali len súbory, ktoré si uložil v editore. Teraz tam nahraj celý priečinok, aby tam bolo všetko, čo je v repository: README, pretiahnutý obrázok, súbory z terminálu.
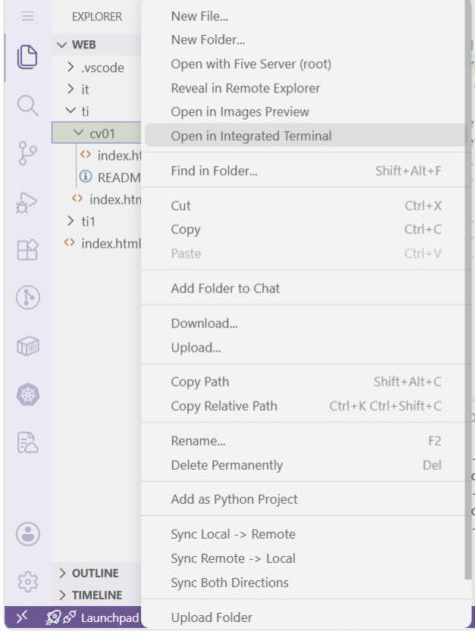
- V Kubeflow v Explorer klikni pravým tlačidlom na priečinok
cv01. Otvorí sa menu; úplne dole v ňom (pri Sync Local → Remote…) klikni Upload Folder. Dole na stavovej lište sa postupne ukazujedone …pre každý nahraný súbor.
- Otvor
https://sigma.tuke.sk/student/meno.priezvisko/ti/cv01/(mimo školy s VPN, návod 00). Má sa zobraziť tvoja stránka presne tak, ako ju má vidieť učiteľ. Ak vidíš starú verziu, F5.
Upload Folder môžeš urobiť kedykoľvek, aj viackrát počas práce. Nahrá všetko naraz a nič nepokazí.
V menu chýba Upload Folder? Rozšírenia sa stratili. Časť 1, bod 3.
Stránka ukazuje 403, 404 alebo je biela: návod 03, Keď to nejde. Na sigma sa nič neupravuje. Oprava sa robí v Kubeflow, uloží sa, pushne sa (časť 5).
During your work only the files you saved in the editor reached sigma. Now upload the whole folder so that everything in the repository is there: README, the dragged image, files from the terminal.
- In Kubeflow, in Explorer, right click the
cv01folder. A menu opens; at its very bottom (next to Sync Local → Remote…) click Upload Folder. The status bar at the bottom showsdone …for each uploaded file in turn.
- Open
https://sigma.tuke.sk/student/name.surname/ti/cv01/(off campus with the VPN, guide 00). Your page must appear exactly as the teacher should see it. If you see an old version, F5.
You can do Upload Folder at any time, also several times during your work. It uploads everything at once and breaks nothing.
Upload Folder missing from the menu? The extensions are gone. Part 1, step 3.
The page shows 403, 404 or is white: guide 03, When it does not work. Nothing is edited on sigma. A fix is made in Kubeflow, saved, pushed (part 5).
8. Ďalší deň: pokračovanie v práci8. The next day: continuing the work
Clone sa robí raz. Keď sa k zadaniu vrátiš, priečinok cv01 v Kubeflow stále máš:
- Časť 1: otvor Kubeflow, skontroluj WEB a rozšírenia.
- Pracuj v
cv01(časť 4). - Commit a push (časť 5). Na GitHub sa pridá ďalší commit.
- Upload Folder a kontrola na sigma (časť 7).
Žiadny clone, žiadne premenovanie. Git si v priečinku pamätá, do ktorého repository patrí.
Priečinok cv01 v Kubeflow nemáš (nový notebook, omylom zmazaný)? Nič sa nestratilo, všetko, čo si pushol, je na GitHub. Zopakuj časť 3 (clone s cv01 na konci) a časť 7 (Upload Folder).
The clone is done once. When you come back to the assignment, you still have the cv01 folder in Kubeflow:
- Part 1: open Kubeflow, check WEB and the extensions.
- Work in
cv01(part 4). - Commit and push (part 5). Another commit is added on GitHub.
- Upload Folder and the check on sigma (part 7).
No clone, no renaming. Git remembers in the folder which repository it belongs to.
No cv01 folder in Kubeflow (a new notebook, deleted by mistake)? Nothing is lost; everything you pushed is on GitHub. Repeat part 3 (clone with cv01 at the end) and part 7 (Upload Folder).
9. Feedback od učiteľa9. Feedback from the teacher
Učiteľ píše poznámky priamo k riadkom tvojho kódu na GitHub, v záložke Pull requests, pull request Feedback. Príde ti e-mail a notifikácia (zvonček vpravo hore). Klikni, prečítaj, oprav v Kubeflow, commit, push. Učiteľ vidí, že si reagoval.
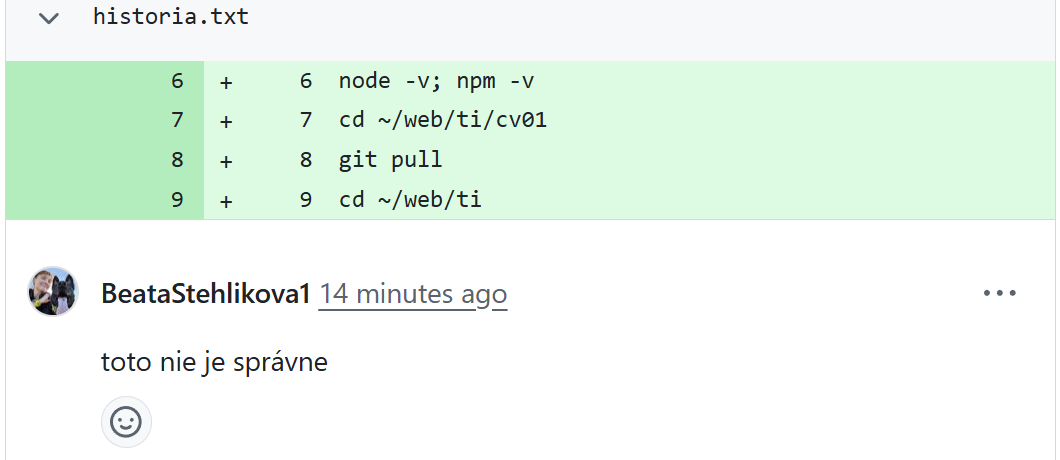
The teacher writes notes directly on the lines of your code on GitHub, in the Pull requests tab, pull request Feedback. You get an e-mail and a notification (the bell at the top right). Click, read, fix in Kubeflow, commit, push. The teacher sees that you reacted.
10. Najčastejšie problémy10. The most common problems
| Kde | Hláška alebo situácia | Príčina | Riešenie |
|---|---|---|---|
| Rozšírenia | Dole nie je Go Live, v menu chýba Upload Folder | rozšírenia sa po reštarte notebooku stratili | časť 1, bod 3: príkaz code-server --install-extension …, potom F1, Developer: Reload Window (alebo F5) |
| Rozšírenia | Upload Folder chýba aj po inštalácii | v Explorer nie je otvorený WEB | koniec adresy zmeň na ?folder=/home/jovyan/web, Enter |
| Clone | clone skončí Authentication failed |
prihlásenie sa prerušilo | rm -rf cv01, clone znova (šípka hore, Enter); pri prihlásení klikni Open, nie No |
| Clone | hore okienko Username / Password | VS Code sa prepol na starý spôsob prihlásenia | Esc, v termináli Ctrl + C, rm -rf cv01, clone znova |
| Clone | kód na github.com/login/device neplatí | kód vypršal | spusti clone znova, dostaneš nový kód |
| Clone | Klonoval si bez cv01 na konci |
vznikol priečinok s dlhým názvom | cd ~/web/ti, potom mv dlhy-nazov cv01 (napíš mv tech a Tab) |
| Clone | destination path 'cv01' already exists |
cv01 už máš, klonuje sa len raz |
pracuj v ňom (časť 8); nanovo: rm -rf cv01 (zmaže aj neodovzdané zmeny) |
| Clone | Máš cv01 aj priečinok s dlhým názvom |
klonoval si druhýkrát bez cv01 |
dlhý priečinok zmaž: rm -rf technologie-… (Tab doplní), pracuj v cv01 |
| Práca | Súbory z repository nie sú na sigma | neurobil si Upload Folder (časť 7) | pravý klik na cv01, v menu úplne dole Upload Folder |
| Práca | Pretiahnutý obrázok alebo súbor z terminálu nie je na sigma | samo sa nahráva len to, čo uložíš v editore | pravý klik na cv01, v menu úplne dole Upload Folder (časť 7) |
| Práca | Vo WinSCP nevidno nové súbory | WinSCP sa neobnovuje sám | Ctrl + R v paneli sigma |
| Práca | Omylom si zmazal alebo pokazil súbor, ktorý už bol v commite | git checkout -- nazov-suboru vráti súbor do stavu z posledného commitu (necommitnuté zmeny v ňom sú preč) |
|
| Práca | Chceš zahodiť všetky necommitnuté zmeny | git checkout -- . |
|
| Commit a push | fatal: not a git repository |
nie si v priečinku zadania | cd ~/web/ti/cv01 |
| Commit a push | nothing to commit, working tree clean |
nič si nezmenil od posledného commitu, alebo súbory nie sú v cv01 |
nie je chyba; skontroluj cez ls, či sú súbory v cv01 |
| Commit a push | push declined due to email privacy restrictions |
v Git máš skutočný e-mail | git config --global user.email "…noreply…" (návod 02 časť 4), potom git commit --amend --reset-author --no-edit a git push |
| Commit a push | ! [rejected] … (fetch first) alebo Your branch is behind… |
na GitHub je commit, ktorý ešte nemáš (napr. učiteľ pridal testy) | git pull, potom git push |
| GitHub | Pri commite je červený ✕ | push prebehol, ale niektorý automatický test neprešiel | časť 6: zisti, ktorý test má FAIL, oprav, commit, push |
| GitHub | Pri commite nie je žiadna značka ani po 5 minútach | zadanie nemá testy, alebo si ešte nepushol | nie je chyba; skontroluj git push |
| sigma | Stránka na sigma ukazuje 403, 404 alebo je biela | návod 03, Keď to nejde |
| Where | Message or situation | Cause | Fix |
|---|---|---|---|
| Extensions | No Go Live at the bottom, Upload Folder missing from the menu | the extensions were lost after a notebook restart | part 1, step 3: the code-server --install-extension … command, then F1, Developer: Reload Window (or F5) |
| Extensions | Upload Folder still missing after installing | WEB is not open in Explorer | change the end of the address to ?folder=/home/jovyan/web, Enter |
| Clone | clone ends with Authentication failed |
the sign-in was interrupted | rm -rf cv01, clone again (arrow up, Enter); when signing in click Open, not No |
| Clone | a Username / Password box at the top | VS Code switched to the old sign-in method | Esc, Ctrl + C in the terminal, rm -rf cv01, clone again |
| Clone | the code on github.com/login/device is not valid | the code expired | run the clone again, you get a new code |
| Clone | You cloned without cv01 at the end |
a folder with the long name appeared | cd ~/web/ti, then mv long-name cv01 (type mv tech and Tab) |
| Clone | destination path 'cv01' already exists |
you already have cv01; you clone only once |
work in it (part 8); to start over: rm -rf cv01 (also deletes unsubmitted changes) |
| Clone | You have cv01 and a folder with the long name |
you cloned a second time without cv01 |
delete the long folder: rm -rf technologie-… (Tab completes it), work in cv01 |
| Work | The repository files are not on sigma | you did not do Upload Folder (part 7) | right click cv01, Upload Folder at the very bottom of the menu |
| Work | A dragged image or a file from the terminal is not on sigma | only what you save in the editor is uploaded by itself | right click cv01, Upload Folder at the very bottom of the menu (part 7) |
| Work | WinSCP does not show new files | WinSCP does not refresh by itself | Ctrl + R in the sigma panel |
| Work | You deleted or broke a file by mistake that was already committed | git checkout -- file-name restores the file to the state of the last commit (uncommitted changes in it are lost) |
|
| Work | You want to throw away all uncommitted changes | git checkout -- . |
|
| Commit and push | fatal: not a git repository |
you are not in the assignment folder | cd ~/web/ti/cv01 |
| Commit and push | nothing to commit, working tree clean |
you changed nothing since the last commit, or the files are not in cv01 |
not an error; check with ls that the files are in cv01 |
| Commit and push | push declined due to email privacy restrictions |
Git has your real e-mail | git config --global user.email "…noreply…" (guide 02 part 4), then git commit --amend --reset-author --no-edit and git push |
| Commit and push | ! [rejected] … (fetch first) or Your branch is behind… |
GitHub has a commit you do not have yet (e.g. the teacher added tests) | git pull, then git push |
| GitHub | A red ✕ next to the commit | the push went through, but an automatic test failed | part 6: find the test marked FAIL, fix, commit, push |
| GitHub | No mark next to the commit even after 5 minutes | the assignment has no tests, or you have not pushed yet | not an error; check git push |
| sigma | The page on sigma shows 403, 404 or is white | guide 03, When it does not work |