GitHub je služba, kde sa ukladá zdrojový kód. Každý tvoj projekt bude mať na GitHub svoj repository (úložisko projektu s celou históriou zmien). Cez GitHub sa zadania rozdávajú aj odovzdávajú a učiteľ v ňom vidí tvoj kód a píše k nemu poznámky.
Budeš potrebovať:
- e-mail, ku ktorému máš prístup. Odporúčam školský
meno.priezvisko@student.tuke.sk, na ten príde pozvánka od učiteľa, - mobil s authenticator app (časť 3, nainštaluješ si ju počas návodu),
- 15 minút.
GitHub is a service where source code is stored. Each of your projects will have its own repository on GitHub (the project's storage with the whole history of changes). Assignments are handed out and submitted through GitHub, and the teacher sees your code there and writes notes on it.
You will need:
- an e-mail you have access to. I recommend the university one,
name.surname@student.tuke.sk; the teacher's invitation goes there, - a phone with an authenticator app (part 3, you install it during this guide),
- 15 minutes.
1. Založenie konta1. Creating the account
Ak už GitHub konto máš, preskoč na časť 2. Skontroluj však, či máš zapnuté two-factor authentication (časť 3), bez neho ťa GitHub do organizácie nepustí.
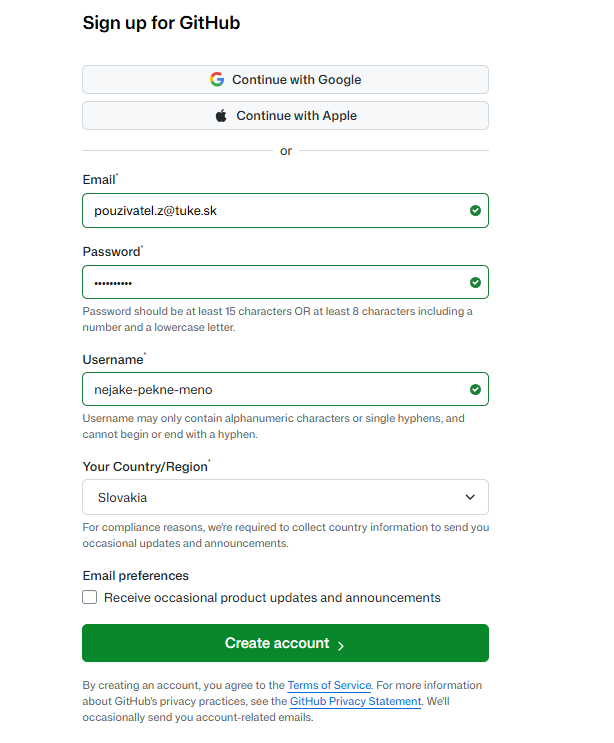
- Otvor github.com/signup.
- Email: školský e-mail. GitHub naň pošle overovací kód.
- Password: silné heslo, aspoň 15 znakov, alebo aspoň 8 znakov s číslom a malým písmenom. Ulož si ho (správca hesiel, poznámka v mobile). Aj keď sa neskôr budeš prihlasovať cez Google, GitHub heslo občas vypýta.
- Username: tvoje verejné meno na GitHub. Odporúčam
meno-priezvisko, malé písmená, bez diakritiky, slová oddelené pomlčkou. Bude v adrese každého tvojho repository a učiteľ podľa neho spozná, kto si. Nedávaj prezývky. - Country: Slovakia. Zaškrtávacie políčko o novinkách nechaj prázdne.
- Create account, potom potvrď, že nie si robot (skladačka).
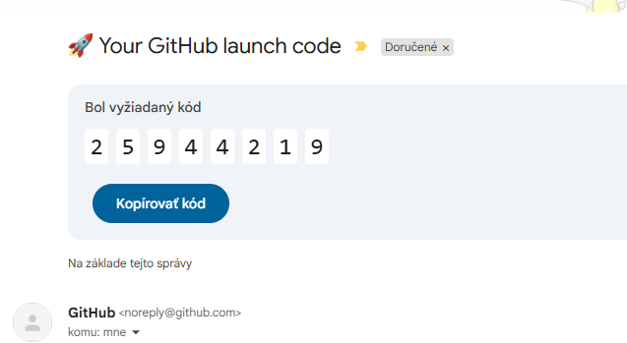
- Na e-mail príde správa „Your GitHub launch code“ s 8-miestnym kódom. Opíš ho (alebo Kopírovať kód a vložiť).
- GitHub sa opýta na pár otázok, na čo ho chceš používať. Preskoč (Skip personalization).
Si prihlásený. Vpravo hore je tvoja ikona profilu.
Prihlasovanie cez Google: ak máš GitHub na gmailovej adrese, môžeš si zapnúť Continue with Google, pri prihlásení potom nepíšeš heslo. GitHub to sám ponúkne („Add new sign in method“, Link account). Heslo si aj tak ulož. GitHub konto môže byť na ľubovoľnom e-maile, ale školská adresa v ňom musí byť pridaná (časť 4).
If you already have a GitHub account, skip to part 2. Do check that two-factor authentication is on (part 3); without it GitHub will not let you into the organization.
- Open github.com/signup.
- Email: your university e-mail. GitHub sends a verification code there.
- Password: a strong password, at least 15 characters, or at least 8 characters with a number and a lowercase letter. Save it (password manager, a note on your phone). Even if you later sign in through Google, GitHub asks for the password now and then.
- Username: your public name on GitHub. I recommend
name-surname, lowercase, no accents, words separated by a hyphen. It will be in the address of every repository of yours, and the teacher recognizes you by it. No nicknames. - Country: Slovakia. Leave the newsletter checkbox empty.
- Create account, then confirm you are not a robot (the puzzle).
- An e-mail "Your GitHub launch code" arrives with an 8-digit code. Type it in (or Copy code and paste).
- GitHub asks a few questions about what you want to use it for. Skip them (Skip personalization).
You are signed in. Your profile icon is in the top right corner.
Signing in with Google: if your GitHub is on a Gmail address, you can turn on Continue with Google; you then do not type the password when signing in. GitHub offers it itself ("Add new sign in method", Link account). Save the password anyway. The GitHub account can be on any e-mail, but the university address must be added to it (part 4).
2. Nastavenie profilu a e-mailu2. Profile and e-mail settings
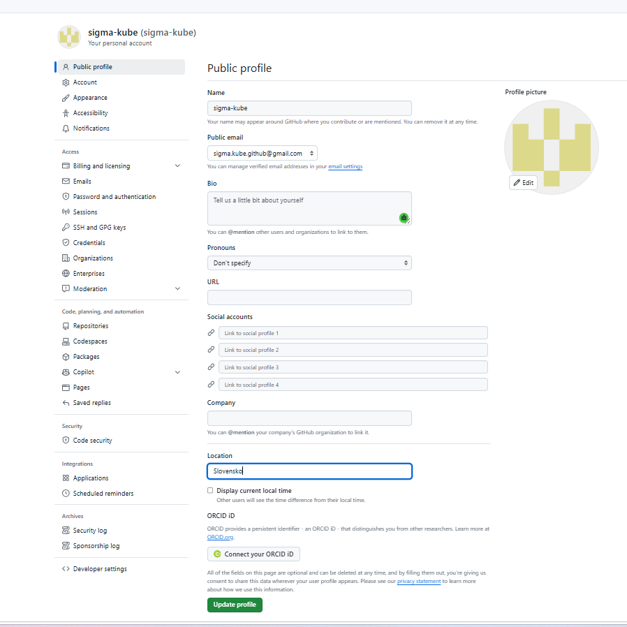
a) Profil. Ikona profilu, Settings, Public profile:
- Name: tvoje skutočné meno a priezvisko (napr. Ján Novák). Učiteľ podľa neho hľadá tvoje práce.
- Public email: Don't show my email.
- Update profile.
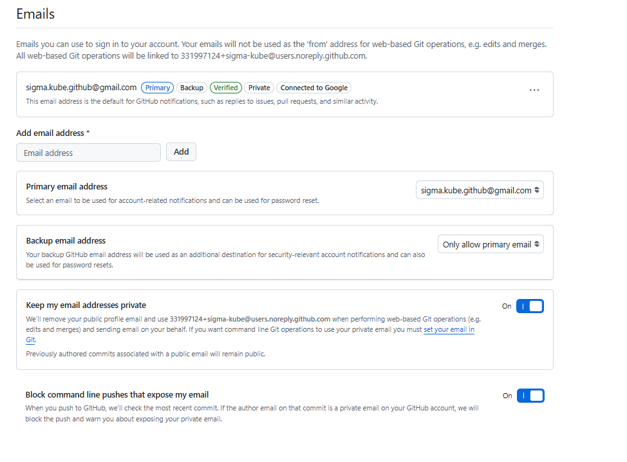
b) Súkromný e-mail. Vľavo Emails:
- Keep my email addresses private: On.
- Block command line pushes that expose my email: On.
Na tejto stránke je veta: „All web-based Git operations will be linked to 123456789+meno-priezvisko@users.noreply.github.com“. Túto adresu si odlož (skopíruj do poznámok), budeš ju potrebovať pri nastavení Git v Kubeflow (návod 02). Je to tvoja verejná náhradná adresa, číslo je pre každého iné. Bez nej ti GitHub neskôr odmietne prijať kód s hláškou „push declined due to email privacy restrictions“.
a) Profile. Profile icon, Settings, Public profile:
- Name: your real first name and surname (e.g. Ján Novák). The teacher looks for your work by it.
- Public email: Don't show my email.
- Update profile.
b) Private e-mail. On the left, Emails:
- Keep my email addresses private: On.
- Block command line pushes that expose my email: On.
This page contains the sentence: "All web-based Git operations will be linked to 123456789+name-surname@users.noreply.github.com". Save this address (copy it into your notes); you will need it when setting up Git in Kubeflow (guide 02). It is your public substitute address; the number is different for everyone. Without it GitHub will later refuse your code with the message "push declined due to email privacy restrictions".
3. Two-factor authentication (2FA)3. Two-factor authentication (2FA)
Two-factor authentication (dvojfaktorové overenie) znamená, že okrem hesla sa pri prihlásení pýta aj 6-miestny kód z tvojho mobilu. GitHub to vyžaduje od každého, kto je v nejakej organizácii, bez 2FA pozvánku neprijmeš.
Potrebuješ authenticator app na mobile. Ak už nejakú máš (pre banku, pre inú službu), použi ju. Ak nie, nainštaluj:
Postup:
- Ikona profilu, Settings, vľavo Password and authentication.
- V časti Two-factor authentication klikni Enable two-factor authentication.
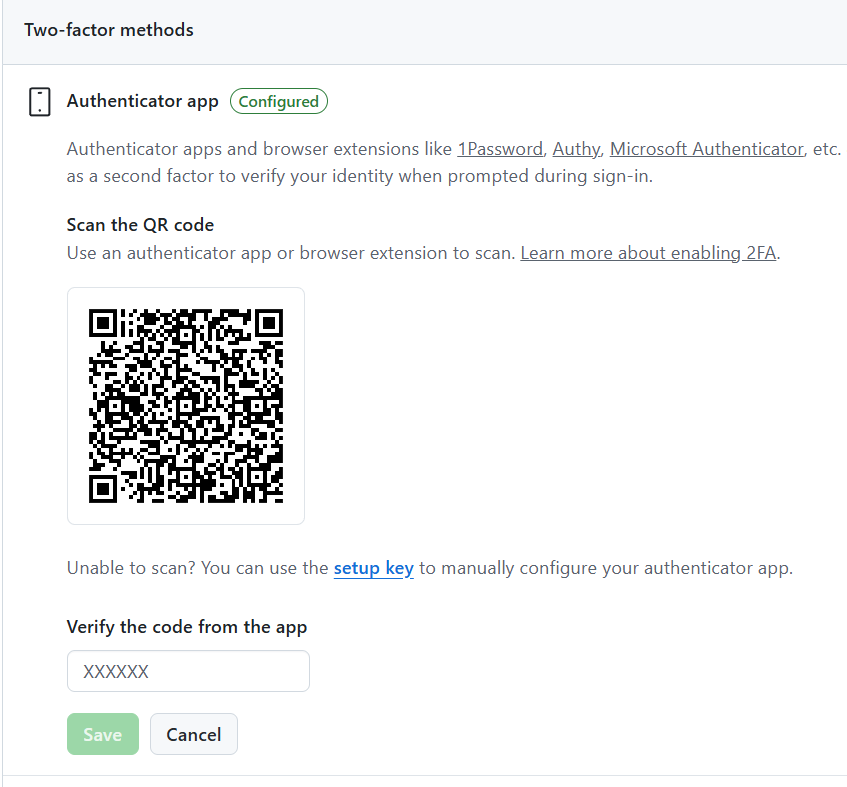
- Vyber Authenticator app (nie SMS, SMS je menej spoľahlivá a nie všade funguje).
-
Zobrazí sa QR kód.
-
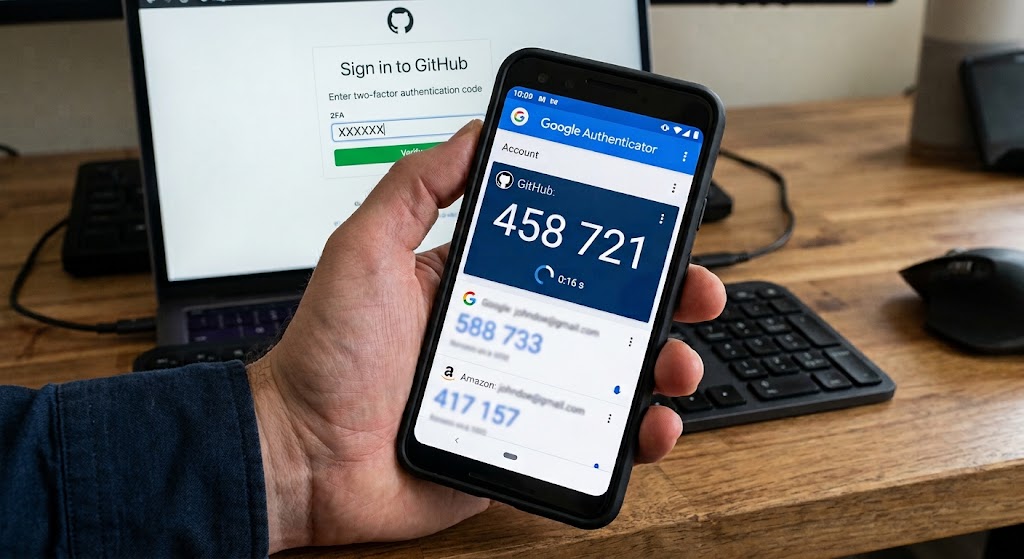
V mobile otvor authenticator app, + (pridať účet), Iný účet / Other, Naskenovať QR kód, namier fotoaparát na obrazovku. V aplikácii pribudne položka „GitHub“ s 6-miestnym číslom, ktoré sa mení každých 30 sekúnd.
- Na GitHub opíš aktuálne 6-miestne číslo. Píš len číslice, bez bodky a medzery, po šiestej číslici sa pole odošle samo.
-
GitHub zobrazí Recovery codes, 16 kódov. Klikni Download a súbor ulož na bezpečné miesto (správca hesiel, súkromný cloud, nie plocha školského počítača). Ak niekedy stratíš mobil, jedine tieto kódy ťa dostanú do konta. Každý kód funguje len raz.
-
Potvrď (I have saved my recovery codes). Od tejto chvíle sa pri každom prihlásení GitHub opýta na kód z mobilu.
Pri najbližšom prihlásení sa môže objaviť „Verify your two-factor authentication settings“. GitHub chce overiť, že ti authenticator naozaj funguje. Klikni Verify 2FA now a opíš kód. Nepreskakuj to.
Čo ak sa nevieš prihlásiť? Pri prihlásení klikni More options, Use a recovery code a zadaj jeden z uložených kódov. Potom si v Settings nastav authenticator nanovo a vygeneruj nové recovery kódy.
Two-factor authentication means that besides the password, signing in also asks for a 6-digit code from your phone. GitHub requires it from everyone who is in an organization; without 2FA you cannot accept the invitation.
You need an authenticator app on your phone. If you already have one (for your bank, for another service), use it. If not, install:
Steps:
- Profile icon, Settings, on the left Password and authentication.
- In the Two-factor authentication section click Enable two-factor authentication.
- Choose Authenticator app (not SMS; SMS is less reliable and does not work everywhere).
-
A QR code appears.
-
On your phone open the authenticator app, + (add account), Other, Scan a QR code, point the camera at the screen. A "GitHub" entry appears in the app with a 6-digit number that changes every 30 seconds.
- On GitHub type the current 6-digit number. Digits only, no dot or space; after the sixth digit the field submits itself.
-
GitHub shows Recovery codes, 16 codes. Click Download and save the file somewhere safe (password manager, private cloud, not the desktop of a lab computer). If you ever lose your phone, only these codes get you into the account. Each code works once.
-
Confirm (I have saved my recovery codes). From now on GitHub asks for the code from your phone at every sign-in.
At the next sign-in "Verify your two-factor authentication settings" may appear. GitHub wants to check that your authenticator really works. Click Verify 2FA now and type the code. Do not skip it.
What if you cannot sign in? When signing in click More options, Use a recovery code and enter one of the saved codes. Then set up the authenticator again in Settings and generate new recovery codes.
4. Pozvánka do organizácie4. The organization invitation
Učiteľ ťa pridá do organizácie. Pre predmety je platná organizácia tuke-fberg-stehlikova (výnimky ti povie učiteľ). Organizácia je spoločný priestor na GitHub, v ktorom sú všetky tvoje repository k predmetom.
Pozvánka príde na e-mail, ktorý má učiteľ v zozname z MAIS (školský). Ak máš GitHub konto na inom e-maile, nevadí. Pridaj si k nemu aj školskú adresu (Settings, Emails, Add email address). Pozvánku prijmeš ktorýmkoľvek kontom a od tej chvíle sa berie to, ktorým si ju prijal.
Ak GitHub konto ešte nemáš, pozvánka aj tak príde. V maile klikni Join, GitHub ťa vyzve na založenie konta a po založení pozvánku hneď potvrdí.
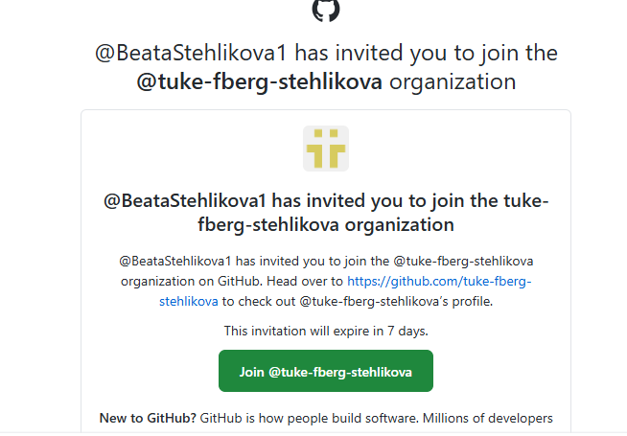
- Otvor e-mail od GitHub s predmetom „You've been invited to the tuke-fberg-stehlikova organization“ a klikni Join @tuke-fberg-stehlikova.
- Ak nie si prihlásený, prihlás sa (heslo alebo Google a kód z authenticator app).
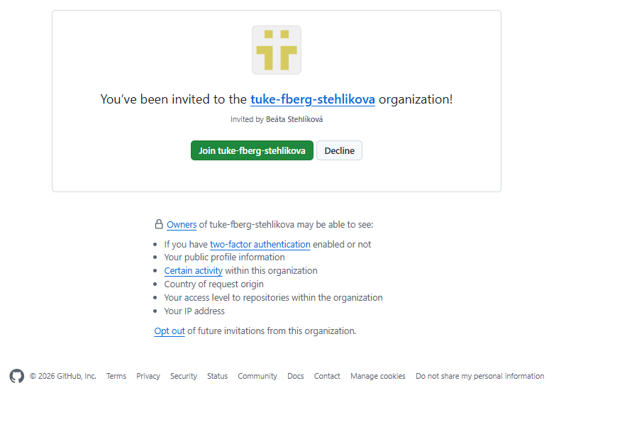
- Na stránke pozvánky klikni Join tuke-fberg-stehlikova.
- Otvorí sa stránka organizácie. Vpravo v časti People si medzi členmi.
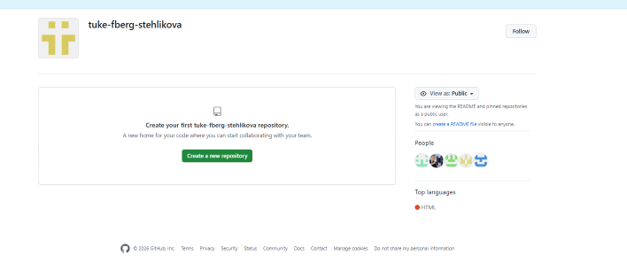
Pozvánku môžeš otvoriť aj priamo: github.com/orgs/tuke-fberg-stehlikova/invitation (prihlásený). Platí 7 dní. Ak ju nestihneš, napíš učiteľovi, pošle novú.
The teacher adds you to an organization. For the courses the organization is tuke-fberg-stehlikova (the teacher will tell you about exceptions). An organization is a shared space on GitHub that holds all your course repositories.
The invitation goes to the e-mail the teacher has in the MAIS list (the university one). If your GitHub account is on another e-mail, that is fine. Add the university address to it as well (Settings, Emails, Add email address). You can accept the invitation with any account, and from then on that account is the one that counts.
If you do not have a GitHub account yet, the invitation still arrives. Click Join in the e-mail; GitHub asks you to create an account and confirms the invitation right after.
- Open the e-mail from GitHub with the subject "You've been invited to the tuke-fberg-stehlikova organization" and click Join @tuke-fberg-stehlikova.
- If you are not signed in, sign in (password or Google plus the code from the authenticator app).
- On the invitation page click Join tuke-fberg-stehlikova.
- The organization page opens. On the right, under People, you are among the members.
You can also open the invitation directly: github.com/orgs/tuke-fberg-stehlikova/invitation (signed in). It is valid for 7 days. If you miss it, write to the teacher, who sends a new one.
5. Kde čo nájdeš5. Where to find things
- Tvoj profil:
https://github.com/tvoje-username, zoznam tvojich repository. - Organizácia: github.com/tuke-fberg-stehlikova, uvidíš len tie repository, ku ktorým máš prístup (svoje). Tlačidlo „Create a new repository“ nepoužívaj, repository k zadaniam vytvára Classroom 50 (návod 04).
- Settings (ikona profilu, Settings): Emails, Password and authentication, SSH and GPG keys (potrebuješ len pri alternatíve klonovania cez SSH, návod 03 časť 7).
- Notifications (zvonček vpravo hore): sem chodia komentáre učiteľa k tvojmu kódu.
- Your profile:
https://github.com/your-username, the list of your repositories. - The organization: github.com/tuke-fberg-stehlikova; you see only the repositories you have access to (your own). Do not use the "Create a new repository" button; assignment repositories are created by Classroom 50 (guide 04).
- Settings (profile icon, Settings): Emails, Password and authentication, SSH and GPG keys (needed only for the SSH cloning alternative, guide 03 part 7).
- Notifications (the bell in the top right corner): the teacher's comments on your code arrive here.