Kubeflow je školský cloud (ml.cloud.tuke.sk), v ktorom si spustíš vlastný VS Code (editor kódu) priamo v prehliadači. Nič sa neinštaluje, funguje z učebne aj z domu, súbory sa ukladajú na disk v cloude (15 GB) a zostávajú tam, aj keď zavrieš prehliadač. Máš tam k dispozícii aj terminal (príkazový riadok), Git, PHP a Composer.
Tento návod robíš raz. Nabudúce už len otvoríš ml.cloud.tuke.sk, Notebooks, Connect.
Kubeflow is the university cloud (ml.cloud.tuke.sk) where you start your own VS Code (code editor) right in the browser. Nothing gets installed, it works from the lab and from home, files are saved on a disk in the cloud (15 GB) and stay there even after you close the browser. You also get a terminal (command line), Git, PHP and Composer.
You do this guide once. Next time you just open ml.cloud.tuke.sk, Notebooks, Connect.
1. Prihlásenie a namespace1. Signing in and the namespace
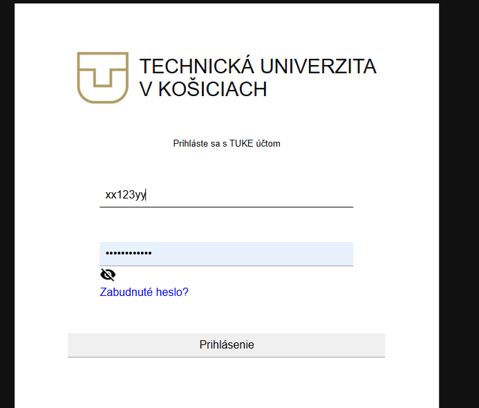
- Otvor ml.cloud.tuke.sk a prihlás sa TUKE loginom (napr.
jn123ab) a heslom.
- Pri prvom prihlásení ťa Kubeflow požiada o vytvorenie namespace, to je tvoj osobný priestor. Navrhne názov podľa tvojho mena (napr.
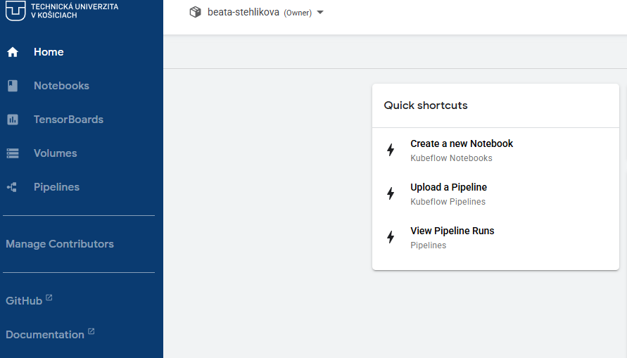
jan-novak). Nechaj navrhnutý názov a potvrď. - Otvorí sa dashboard s ľavým menu. Z neho použiješ len Notebooks.
- Open ml.cloud.tuke.sk and sign in with your TUKE login (e.g.
jn123ab) and password.
- At the first sign-in Kubeflow asks you to create a namespace, your personal space. It suggests a name based on yours (e.g.
jan-novak). Keep the suggested name and confirm. - The dashboard opens with a menu on the left. You will use only Notebooks.
2. Vytvorenie notebooku (VS Code)2. Creating the notebook (VS Code)
Notebook v Kubeflow znamená bežiace prostredie, v našom prípade VS Code.
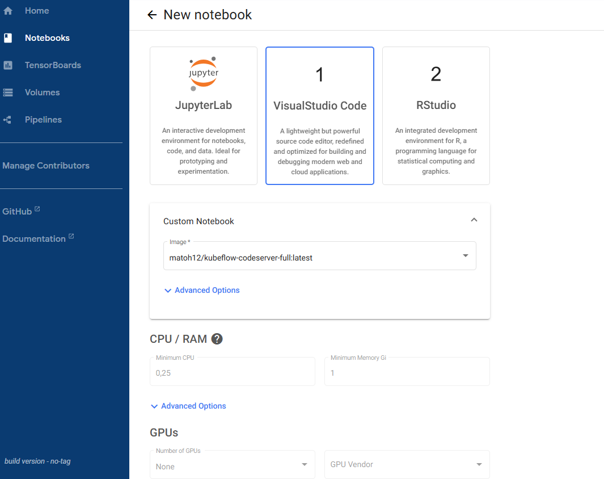
- Vľavo klikni Notebooks, vpravo hore + New Notebook.
- Name:
vscode(malé písmená, bez medzier a diakritiky, inak tlačidlo Launch nesvieti). - Vyber kartu VisualStudio Code (stredná z troch).
- Custom Notebook nechaj tak. Je v ňom nastavený image
matoh12/kubeflow-codeserver-full:latest, ktorý obsahuje PHP, Composer, Git a SSH. Nič nerozbaľuj, nič nemeň. - CPU / RAM, GPUs a ostatné polia nechaj predvolené.
- Klikni LAUNCH.
- V zozname sa objaví
vscodeso stavom „Creating“. Počkaj na zelenú fajku (1 až 3 minúty, pri prvom spustení aj dlhšie). Potom klikni CONNECT.
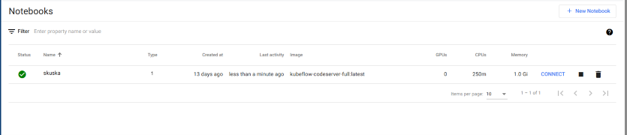
VS Code sa otvorí v novej karte prehliadača.
Zastavenie a spustenie: notebook môžeš nechať bežať. Ak ho v zozname zastavíš (ikona štvorca) a znova spustíš (trojuholník), tvoje súbory zostanú. Sú na disku, nie v notebooku.
A notebook in Kubeflow is a running environment, in our case VS Code.
- On the left click Notebooks, top right + New Notebook.
- Name:
vscode(lowercase, no spaces or accents, otherwise the Launch button stays disabled). - Choose the VisualStudio Code card (the middle one of three).
- Leave Custom Notebook as it is. It is set to the image
matoh12/kubeflow-codeserver-full:latest, which contains PHP, Composer, Git and SSH. Do not expand or change anything. - Leave CPU / RAM, GPUs and the other fields at their defaults.
- Click LAUNCH.
vscodeappears in the list with the status "Creating". Wait for the green tick (1 to 3 minutes, longer at the first start). Then click CONNECT.
VS Code opens in a new browser tab.
Stopping and starting: you can leave the notebook running. If you stop it in the list (square icon) and start it again (triangle), your files stay. They are on the disk, not in the notebook.
3. Prvé nastavenie VS Code3. First VS Code setup
Dôvera a uvítacia karta
Po štarte je vľavo panel Explorer (ikona dvoch listov v ľavom pruhu) s nadpisom JOVYAN. To je tvoj domovský priečinok /home/jovyan (jovyan je používateľské meno v cloude, rovnaké pre všetkých). Na začiatku je skoro prázdny, vidíš len pár skrytých priečinkov (.cache, .config, .local), tie nechaj tak.
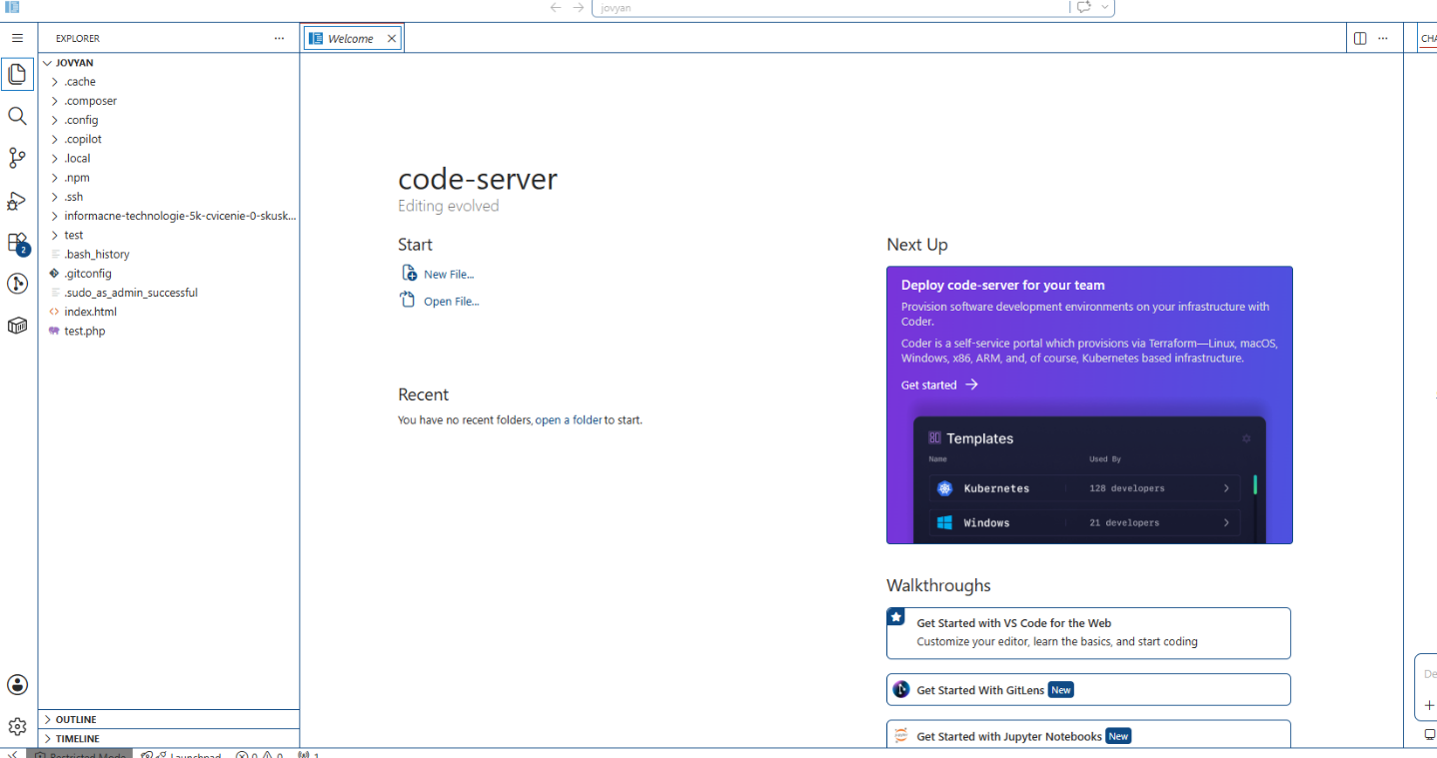
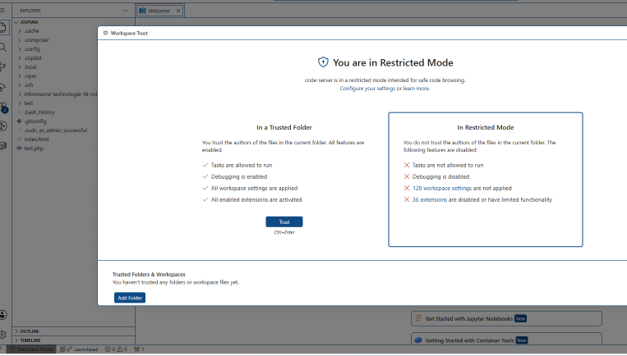
Vľavo dole na stavovej lište môže svietiť Restricted Mode. Klikni naň a v okne Workspace Trust klikni Trust. Bez toho nefungujú rozšírenia.
Uvítaciu kartu Welcome zavri krížikom.
Nastavenia
Stlač Ctrl + , (Ctrl a čiarka), otvorí sa Settings. Do vyhľadávacieho poľa napíš postupne:
auto save, Files: Auto Save nastav naafterDelay. Súbory sa ukladajú samy asi sekundu po tom, čo prestaneš písať. Ctrl + S nikdy nezaškodí, ale nemusíš naň myslieť.font size, Editor: Font Size podľa oka (14 až 16).color theme, Workbench: Color Theme podľa chuti.
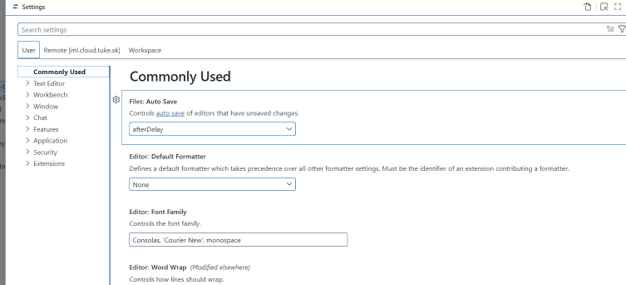
Settings sa ukladajú samy, kartu zavri.
Terminal
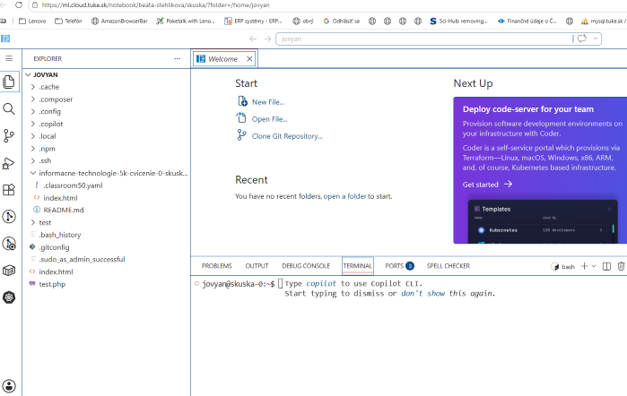
Terminal je príkazový riadok. Budeš doň písať príkazy pre Git a na spúšťanie PHP. Otvoríš ho cez menu ☰ (tri vodorovné čiarky vľavo hore, nad ikonou Explorer), Terminal, New Terminal. Dole sa objaví panel s textom jovyan@vscode-0:~$. To je prompt, čaká na príkaz. Sivý text o Copilot CLI zmizne, keď začneš písať.
Pravidlá pre terminal:
- Príkaz píš celý na jeden riadok, Enter stlač až na konci.
- Vždy jeden príkaz, Enter, potom ďalší. Dva príkazy zlepené na jednom riadku skončia chybou.
- Ak sa terminal zdanlivo zasekne (nič nevypisuje, prompt sa nevracia), stlač Ctrl + C.
- Šípka hore vráti predchádzajúci príkaz, Tab dopĺňa názvy súborov.
- Viac terminálov naraz: ikona + v paneli terminálu.
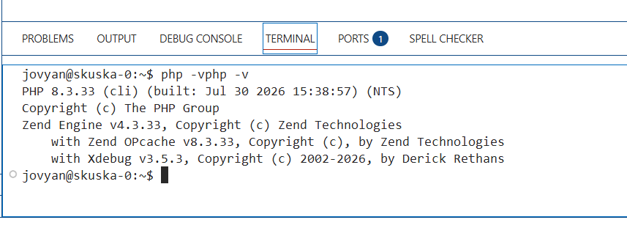
Skúška, napíš a stlač Enter:
php -v
Má vypísať „PHP 8.3…“. Ak áno, prostredie je v poriadku.
Rozšírenia (extensions)
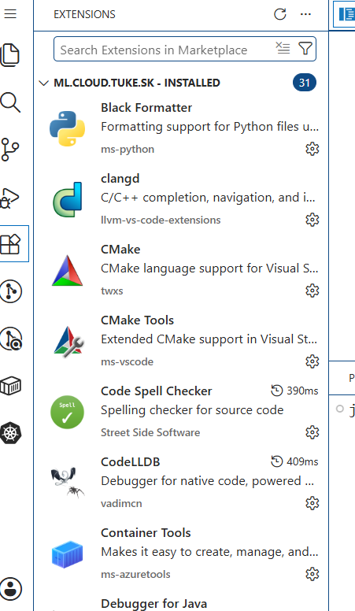
Extensions pridávajú editoru podporu pre jazyky a nástroje. Klikni v ľavom pruhu na ikonu štyroch štvorčekov (alebo Ctrl + Shift + X), do poľa napíš názov a pri správnej položke klikni Install:
| Napíš | Nainštaluj | Na čo |
|---|---|---|
natizyskunk |
SFTP (Natizyskunk) | automatické kopírovanie súborov na sigma pri každom uložení (návod 03) |
intelephense |
PHP Intelephense (Ben Mewburn) | dopĺňanie PHP kódu, podčiarkovanie chýb, skok na definíciu |
five server |
Live Server (Five Server) (yandeu) | rýchly náhľad HTML stránky bez sigma |
twig |
Twig Language 2 (mblode) | zvýrazňovanie Twig šablón (len ak to predmet používa) |

Po reštarte notebooku: rozšírenia znova
Kubeflow rozšírenia pri reštarte notebooku zmaže. Spoznáš to tak, že dole na lište chýba Go Live a v menu nie je Upload Folder. Nehľadaj ich po jednom, nainštaluj všetky naraz jedným príkazom v termináli:
code-server --install-extension Natizyskunk.sftp --install-extension yandeu.five-server --install-extension bmewburn.vscode-intelephense-client --install-extension mblode.twig-language-2
Trvá to asi minútu. Potom F1, napíš reload, Developer: Reload Window (alebo F5). Nastavenia (sftp.json, Git, kľúče) sú na disku a zostávajú. Tento krok budeš robiť často, je aj v návode 04 ako prvý bod každého otvorenia Kubeflow.
Pri Intelephense sa objaví hláška o platenej licencii, klikni Dismiss, bezplatná verzia stačí. Potom v Settings (Ctrl + ,) vyhľadaj intelephense environment php version a nastav 8.1.0. Na sigma je PHP 8.1, editor ti tak podčiarkne veci, ktoré by tam nebežali.
Potom klikni naspäť na ikonu Explorer.
Trust and the welcome tab
After the start, the Explorer panel is on the left (the two-pages icon in the left bar) with the heading JOVYAN. That is your home folder /home/jovyan (jovyan is the user name in the cloud, the same for everyone). It is almost empty at first; you see a few hidden folders (.cache, .config, .local), leave them alone.
Restricted Mode may be shown at the bottom left of the status bar. Click it and in the Workspace Trust window click Trust. Extensions do not work without it.
Close the Welcome tab with the cross.
Settings
Press Ctrl + , (Ctrl and comma) to open Settings. In the search box type, one after another:
auto save, set Files: Auto Save toafterDelay. Files save themselves about a second after you stop typing. Ctrl + S never hurts, but you do not have to think about it.font size, Editor: Font Size to taste (14 to 16).color theme, Workbench: Color Theme to taste.
Settings save themselves; close the tab.
Terminal
The terminal is the command line. You will type Git commands and run PHP in it. Open it through the ☰ menu (three horizontal lines at the top left, above the Explorer icon), Terminal, New Terminal. A panel appears at the bottom with the text jovyan@vscode-0:~$. That is the prompt, waiting for a command. The grey text about Copilot CLI disappears when you start typing.
Terminal rules:
- Type the whole command on one line and press Enter only at the end.
- Always one command, Enter, then the next. Two commands glued on one line end in an error.
- If the terminal seems stuck (prints nothing, the prompt does not come back), press Ctrl + C.
- The up arrow brings back the previous command, Tab completes file names.
- Several terminals at once: the + icon in the terminal panel.
Test: type and press Enter:
php -v
It should print "PHP 8.3…". If so, the environment is fine.
Extensions
Extensions add language and tool support to the editor. Click the four-squares icon in the left bar (or Ctrl + Shift + X), type the name in the box and click Install next to the right item:
| Type | Install | Purpose |
|---|---|---|
natizyskunk |
SFTP (Natizyskunk) | automatic copying of files to sigma on every save (guide 03) |
intelephense |
PHP Intelephense (Ben Mewburn) | PHP code completion, error underlining, go to definition |
five server |
Live Server (Five Server) (yandeu) | quick preview of an HTML page without sigma |
twig |
Twig Language 2 (mblode) | Twig template highlighting (only if the course uses it) |
After a notebook restart: the extensions again
Kubeflow deletes the extensions when the notebook restarts. You can tell because Go Live is missing from the status bar and Upload Folder is not in the menu. Do not look for them one by one; install all of them at once with one command in the terminal:
code-server --install-extension Natizyskunk.sftp --install-extension yandeu.five-server --install-extension bmewburn.vscode-intelephense-client --install-extension mblode.twig-language-2
It takes about a minute. Then F1, type reload, Developer: Reload Window (or F5). Settings (sftp.json, Git, keys) are on the disk and stay. You will do this step often; it is also the first step of every Kubeflow session in guide 04.
Intelephense shows a message about a paid licence; click Dismiss, the free version is enough. Then in Settings (Ctrl + ,) search for intelephense environment php version and set 8.1.0. Sigma runs PHP 8.1, so the editor will underline things that would not run there.
Then click back on the Explorer icon.
4. Nastavenie Git (raz)4. Git setup (once)
Git je nástroj na verzovanie. Zaznamenáva každú zmenu v projekte a umožňuje sa k staršej verzii vrátiť. Než ním prvýkrát čokoľvek uložíš, potrebuje vedieť, kto si. V termináli napíš (nahraď meno a noreply adresu z GitHub, ktorú si si odložil v návode 01):
git config --global user.name "Ján Novák"
git config --global user.email "123456789+jan-novak@users.noreply.github.com"
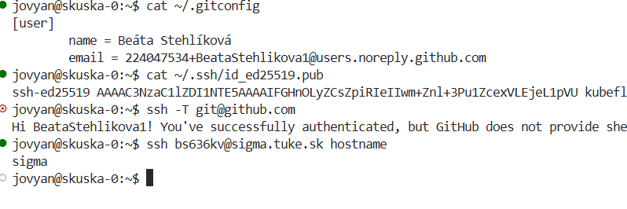
Kontrola:
cat ~/.gitconfig
Vypíše [user] s tvojím menom a adresou.
Prečo noreply adresa: GitHub má nastavené, že tvoju skutočnú adresu do kódu nepustí („push declined due to email privacy restrictions“). S noreply adresou to prejde a tvoje zmeny sa správne priradia k tvojmu kontu.
Git is a version control tool. It records every change in the project and lets you go back to an older version. Before you save anything with it for the first time, it needs to know who you are. In the terminal type (replace the name and the noreply address from GitHub you saved in guide 01):
git config --global user.name "Ján Novák"
git config --global user.email "123456789+jan-novak@users.noreply.github.com"
Check:
cat ~/.gitconfig
It prints [user] with your name and address.
Why the noreply address: GitHub is set to keep your real address out of the code ("push declined due to email privacy restrictions"). With the noreply address it goes through and your changes are correctly linked to your account.
5. SSH kľúč: Kubeflow → sigma (raz)5. SSH key: Kubeflow → sigma (once)
SSH kľúč je dvojica súborov: private key (súkromný, zostáva v Kubeflow, nikdy ho nikomu nedávaš) a public key (verejný, ten dáš na sigma). Keď má sigma tvoj verejný kľúč, Kubeflow sa jej preukáže súkromným a súbory sa kopírujú bez hesla (návod 03).
- V termináli vygeneruj kľúč (raz):
ssh-keygen -t ed25519 -C "kubeflow" -N "" -f ~/.ssh/id_ed25519
Vzniknú dva súbory: ~/.ssh/id_ed25519 (súkromný, nikdy ho nevypisuj ani nekopíruj) a ~/.ssh/id_ed25519.pub (verejný).
- Pošli verejný kľúč na sigma:
ssh-copy-id jn123ab@sigma.tuke.sk
(nahraď jn123ab svojím TUKE loginom). Opýta sa „continue connecting?“, napíš yes, potom vypýta tvoje TUKE heslo (pri písaní sa nič nezobrazuje, to je normálne). Vypíše „Number of key(s) added: 1“.
Skúška:
ssh jn123ab@sigma.tuke.sk hostname
Má vypísať sigma bez pýtania hesla.
Rovnaký kľúč sa dá použiť aj pre GitHub, ak by si chcel klonovať cez SSH namiesto HTTPS. Nie je to potrebné, postup je v návode 03, časť 7.
An SSH key is a pair of files: a private key (stays in Kubeflow, you never give it to anyone) and a public key (you give it to sigma). Once sigma has your public key, Kubeflow proves itself with the private one and files are copied without a password (guide 03).
- Generate the key in the terminal (once):
ssh-keygen -t ed25519 -C "kubeflow" -N "" -f ~/.ssh/id_ed25519
Two files appear: ~/.ssh/id_ed25519 (private; never print or copy it) and ~/.ssh/id_ed25519.pub (public).
- Send the public key to sigma:
ssh-copy-id jn123ab@sigma.tuke.sk
(replace jn123ab with your TUKE login). It asks "continue connecting?", type yes, then it asks for your TUKE password (nothing shows while typing, that is normal). It prints "Number of key(s) added: 1".
Test:
ssh jn123ab@sigma.tuke.sk hostname
It should print sigma without asking for a password.
The same key can also be used for GitHub if you would rather clone over SSH than HTTPS. It is not needed; the steps are in guide 03, part 7.
6. Priečinok web: tu budú všetky projekty6. The web folder: all projects live here
Všetky zadania budeš mať v jednom priečinku web, ktorý má rovnakú štruktúru ako tvoj public_html na sigma. Vďaka tomu sa v návode 03 nastaví kopírovanie na sigma len raz.
- V termináli:
mkdir -p ~/web
- Otvor tento priečinok ako pracovný: menu ☰, File, Open Folder, do poľa napíš
/home/jovyan/web/, OK. Ak sa opýta na dôveru, klikni Yes, I trust the authors.
V Explorer je teraz nadpis WEB namiesto JOVYAN. Odteraz pracuješ vždy tu. Nabudúce si VS Code tento priečinok otvorí sám.
Štruktúra (názvy priečinkov podľa pokynu učiteľa):
Kubeflow: /home/jovyan/web/      ←→   sigma: ~/public_html/
    ├── ti/cv01/                          ├── ti/cv01/
    ├── ti/cv02/                          ├── ti/cv02/
    └── it/cv01/                          └── it/cv01/
All assignments go into one folder web, which has the same structure as your public_html on sigma. Thanks to that, copying to sigma is set up only once, in guide 03.
- In the terminal:
mkdir -p ~/web
- Open this folder as your workspace: ☰ menu, File, Open Folder, type
/home/jovyan/web/in the field, OK. If it asks about trust, click Yes, I trust the authors.
The Explorer heading is now WEB instead of JOVYAN. From now on you always work here. Next time VS Code opens this folder by itself.
Structure (folder names as your teacher says):
Kubeflow: /home/jovyan/web/      ←→   sigma: ~/public_html/
    ├── ti/cv01/                          ├── ti/cv01/
    ├── ti/cv02/                          ├── ti/cv02/
    └── it/cv01/                          └── it/cv01/
7. Súbory a priečinky: Explorer a terminál7. Files and folders: Explorer and the terminal
Všetko, čo robíš so súbormi, sa dá urobiť dvoma spôsobmi: klikaním v Explorer (ľavý panel) alebo príkazom v termináli. Výsledok je rovnaký, vyber si, čo ti je bližšie. Na cvičeniach používame oboje.
Explorer (klikaním)
Explorer ukazuje strom priečinkov pod WEB. Šípka pred názvom priečinok rozbalí alebo zbalí, klik na súbor ho otvorí v editore.
- Nový priečinok: pravý klik na priečinok, v ktorom má vzniknúť (napr.
ti), New Folder…, názov, Enter. Malé písmená, bez medzier a diakritiky. - Nový súbor: pravý klik na priečinok (napr.
cv01), New File…, názov s príponou (index.html,style.css,index.php), Enter. Súbor sa hneď otvorí. - Premenovanie: pravý klik, Rename… (alebo F2).
- Zmazanie: pravý klik, Delete. Pýta sa na potvrdenie.
- Presun: chyť súbor myšou a pusti ho na iný priečinok v Explorer.
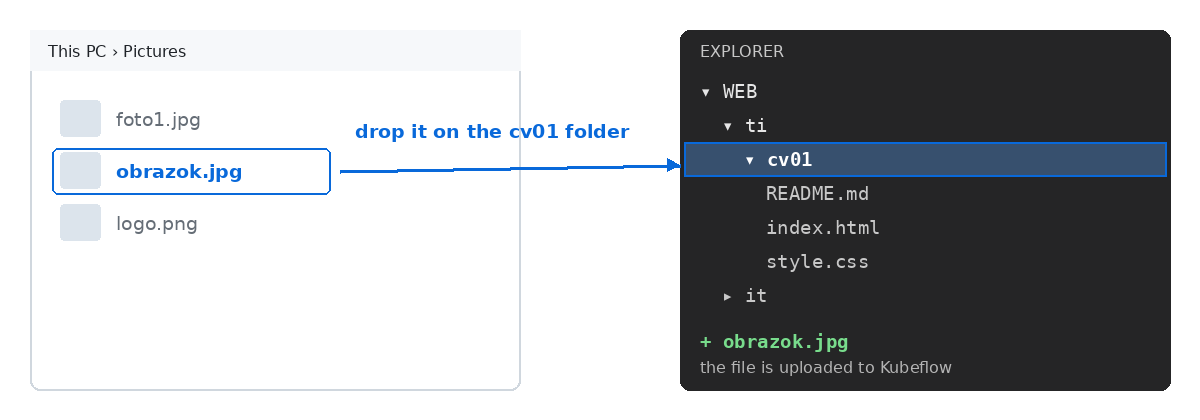
- Súbor z tvojho počítača (obrázok, PDF, čokoľvek): otvor Prieskumník (Windows) alebo Finder, chyť súbor myšou a pusti ho na priečinok v Explorer. Kubeflow ho nahrá. Funguje aj viac súborov naraz.
- Súbor z Kubeflow do počítača: pravý klik na súbor, Download….
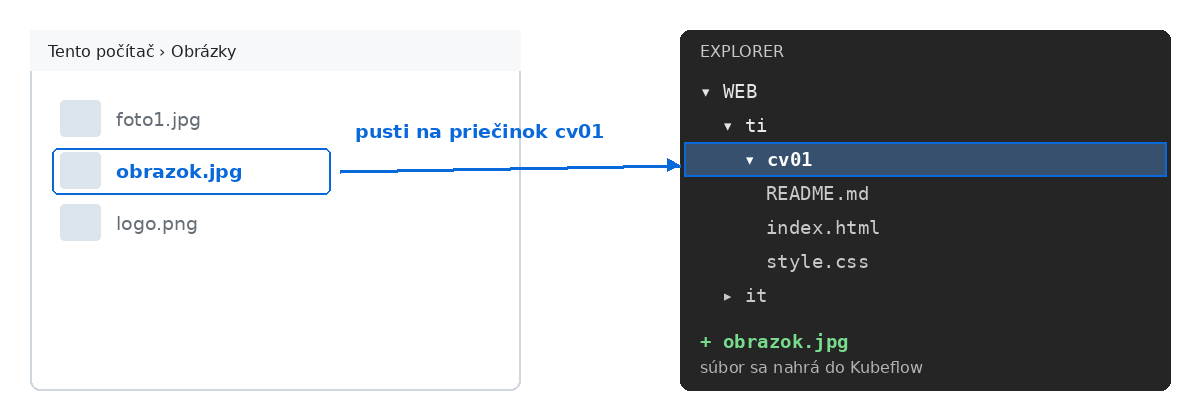
Obrázok pretiahnutý do Explorer je v Kubeflow, ale nie na sigma. Na sigma sa samo nahráva len to, čo uložíš v editore. Pretiahnuté súbory nahraj pravým klikom na priečinok, Upload Folder (návod 03).
Terminál (príkazmi)
Terminál má vždy „aktuálny priečinok“, v ktorom príkazy pracujú. Vidíš ho v prompte pred $: ~/web/ti$ znamená, že si v /home/jovyan/web/ti. Vlnovka ~ je skratka za tvoj domovský priečinok /home/jovyan.
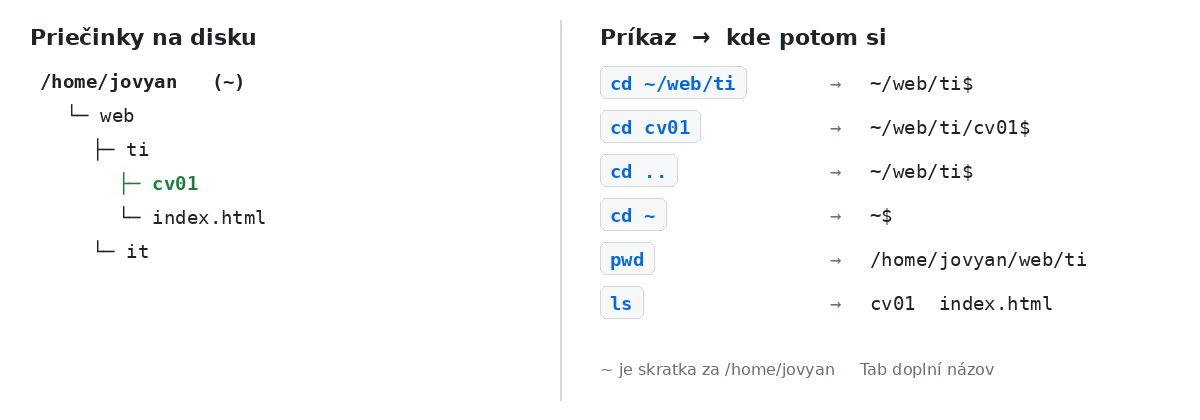
| Príkaz | Čo robí |
|---|---|
pwd |
vypíše, v ktorom priečinku si (celú cestu) |
ls |
zoznam súborov a priečinkov v aktuálnom priečinku (ls -la aj skryté, s detailmi) |
cd nazov |
prejsť do priečinka; cd ~/web/ti/cv01 prejde rovno celou cestou |
cd .. |
o úroveň vyššie |
cd ~ |
domov (/home/jovyan) |
mkdir nazov |
vytvoriť priečinok; mkdir -p a/b/c vytvorí celú cestu naraz |
touch nazov |
vytvoriť prázdny súbor |
cp odkial kam |
skopírovať súbor; cp -r priečinok |
mv odkial kam |
presunúť alebo premenovať (súbor aj priečinok) |
rm subor |
zmazať súbor; rm -r priecinok zmazať priečinok aj s obsahom (bez potvrdenia!) |
cat subor |
vypísať obsah súboru |
Pomôcky: Tab doplní názov súboru alebo priečinka (napíš prvé písmená a stlač Tab), šípka hore vráti predchádzajúci príkaz, Ctrl + C preruší príkaz, ktorý sa zasekol. Príkaz vždy skontroluj cez ls: čo nevidíš vo výpise, neexistuje.
Skúška, napíš po riadkoch:
cd ~/web
mkdir -p pieskovisko/projekt
cd pieskovisko
touch poznamky.txt
ls
cd projekt
pwd
cd ..
rm -r projekt
ls
Po prvom ls vidíš poznamky.txt a projekt, pwd vypíše /home/jovyan/web/pieskovisko/projekt, po druhom ls je projekt preč. To isté sa deje v Explorer, pozri sa tam.
Ďalšie užitočné veci
- HTML kostra: v prázdnom
.htmlsúbore napíš!a stlač Tab. Vygeneruje sa základ stránky. - Náhľad Markdown (napr.
README.mdso zadaním): Ctrl + Shift + V. - Náhľad HTML bez sigma: pravý klik do súboru, Open with Five Server. Otvorí sa karta prehliadača, ktorá sa obnovuje po každom uložení. (Hlavná cesta je sigma, návod 03.)
- Príkazová paleta: F1 alebo Ctrl + Shift + P, vyhľadávanie všetkých príkazov VS Code. V poli je na začiatku
>. Bez neho hľadáš súbory, nie príkazy. - Source Control (ikona vetvičky): Git klikaním, návod 04.
Everything you do with files can be done in two ways: by clicking in Explorer (the left panel) or with a command in the terminal. The result is the same; pick whichever suits you. In the lab we use both.
Explorer (by clicking)
Explorer shows the folder tree under WEB. The arrow in front of a name expands or collapses a folder; clicking a file opens it in the editor.
- New folder: right click the folder it should go into (e.g.
ti), New Folder…, the name, Enter. Lowercase, no spaces or accents. - New file: right click a folder (e.g.
cv01), New File…, a name with an extension (index.html,style.css,index.php), Enter. The file opens right away. - Rename: right click, Rename… (or F2).
- Delete: right click, Delete. It asks for confirmation.
- Move: grab the file with the mouse and drop it on another folder in Explorer.
- A file from your computer (an image, a PDF, anything): open File Explorer (Windows) or Finder, grab the file with the mouse and drop it on a folder in Explorer. Kubeflow uploads it. Several files at once work too.
- A file from Kubeflow to your computer: right click the file, Download….
An image dragged into Explorer is in Kubeflow but not on sigma. Only what you save in the editor is uploaded to sigma by itself. Upload dragged files with a right click on the folder, Upload Folder (guide 03).
Terminal (by commands)
The terminal always has a "current folder" the commands work in. You see it in the prompt before $: ~/web/ti$ means you are in /home/jovyan/web/ti. The tilde ~ is short for your home folder /home/jovyan.
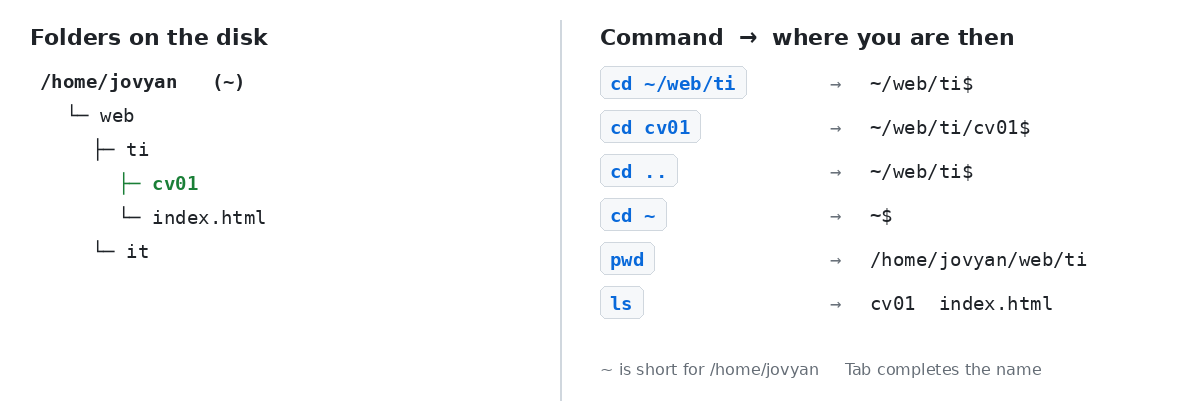
| Command | What it does |
|---|---|
pwd |
prints the folder you are in (the full path) |
ls |
lists the files and folders in the current folder (ls -la hidden ones too, with details) |
cd name |
enter a folder; cd ~/web/ti/cv01 goes the whole way at once |
cd .. |
one level up |
cd ~ |
home (/home/jovyan) |
mkdir name |
create a folder; mkdir -p a/b/c creates the whole path at once |
touch name |
create an empty file |
cp from to |
copy a file; cp -r a folder |
mv from to |
move or rename (a file or a folder) |
rm file |
delete a file; rm -r folder delete a folder with its contents (no confirmation!) |
cat file |
print the contents of a file |
Helpers: Tab completes a file or folder name (type the first letters and press Tab), the up arrow brings back the previous command, Ctrl + C interrupts a stuck command. Always check a command with ls: what you do not see in the listing does not exist.
Test; type line by line:
cd ~/web
mkdir -p pieskovisko/projekt
cd pieskovisko
touch poznamky.txt
ls
cd projekt
pwd
cd ..
rm -r projekt
ls
After the first ls you see poznamky.txt and projekt, pwd prints /home/jovyan/web/pieskovisko/projekt, after the second ls projekt is gone. The same happens in Explorer; have a look.
Other useful things
- HTML skeleton: in an empty
.htmlfile type!and press Tab. The page skeleton is generated. - Markdown preview (e.g.
README.mdwith the assignment): Ctrl + Shift + V. - HTML preview without sigma: right click in the file, Open with Five Server. A browser tab opens that refreshes after every save. (The main route is sigma, guide 03.)
- Command palette: F1 or Ctrl + Shift + P, a search across all VS Code commands. The field starts with
>. Without it you search files, not commands. - Source Control (the branch icon): Git by clicking, guide 04.
Keď to nejdeWhen it does not work
| Problém | Čo skúsiť |
|---|---|
| Tlačidlo LAUNCH nesvieti | v Name sú veľké písmená, medzera alebo diakritika |
| Notebook je dlho v stave Creating | počkaj 5 minút, obnov stránku; ak nič, Stop a Start |
| Rozšírenia sa nedajú nainštalovať alebo nefungujú | vľavo dole Restricted Mode, klikni a Trust |
php -v píše „command not found“ |
notebook beží na starom image; zastav ho, v zozname klikni ceruzku, skontroluj image a spusti znova |
ssh-copy-id píše „Permission denied“ |
zlé TUKE heslo alebo login; login je jn123ab, nie e-mail |
| Explorer ukazuje JOVYAN namiesto WEB | menu ☰, File, Open Folder, /home/jovyan/web/ |
| Explorer ukazuje TI (alebo iný priečinok) namiesto WEB | koniec adresy v prehliadači zmeň na ?folder=/home/jovyan/web, Enter |
| Stratili sa rozšírenia (v menu chýba Upload Folder, dole nie je Go Live) | príkaz z časti 3 (code-server --install-extension …), potom F1, Developer: Reload Window (alebo F5) |
| Problem | What to try |
|---|---|
| The LAUNCH button stays disabled | Name contains capital letters, a space or accents |
| The notebook stays in Creating for long | wait 5 minutes, refresh the page; if nothing, Stop and Start |
| Extensions cannot be installed or do not work | Restricted Mode at the bottom left, click it and Trust |
php -v says "command not found" |
the notebook runs on an old image; stop it, click the pencil in the list, check the image and start again |
ssh-copy-id says "Permission denied" |
wrong TUKE password or login; the login is jn123ab, not the e-mail |
| Explorer shows JOVYAN instead of WEB | ☰ menu, File, Open Folder, /home/jovyan/web/ |
| Explorer shows TI (or another folder) instead of WEB | change the end of the browser address to ?folder=/home/jovyan/web, Enter |
| The extensions are gone (no Upload Folder in the menu, no Go Live at the bottom) | the command from part 3 (code-server --install-extension …), then F1, Developer: Reload Window (or F5) |